Saturday, September 16, 2017

Broccoli Harvest Begins

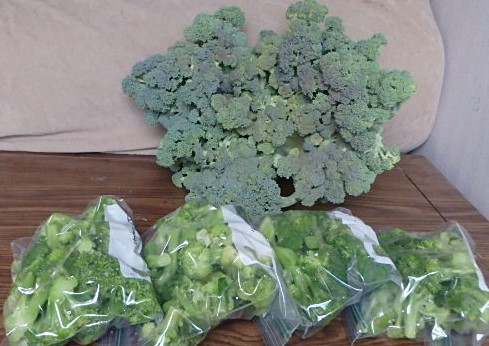
This year the broccoli got off to a late start, but they have made up for lost time from the looks of things.  My starts didn't grow well and died off within weeks of planting so I ended up planting a flat of broccoli from the local nursery.  They were slow to start growing also and I was afraid that I wouldn't be getting much of a broccoli harvest this year, but I have been pleasantly surprised.

The broccoli bed hasn't gotten much attention in the past few weeks since I have been so busy harvesting the squash, beans and cucumbers.  I did notice that they had started to growing their flowering heads but they were small and unripe the last time I got a good look at them so I thought it would be awhile before I could harvest anything.  I am glad that I had a chance to check on them today.  The heads were huge and a couple of them were on the verge of bolting so I made a beeline for my knife and a bowl and promptly harvested two enormous heads.


I think broccoli stores best frozen so I made short work of one of the heads by chopping it up into manageable florets and blanching it in boiling water for 3-5 minutes.  Once they were blanched I transferred them to an ice water bath so they would cool quickly.
After they cooled down enough I drained them into the sink and let them drip dry for a few minutes

This year I am only freezing the florets for myself and giving the chickens the scraps of the thick, tough stems.  I think I will still have plenty for the freezer despite giving half the head to the chickens.  This one broccoli head gave me at least eight servings of broccoli that I will be freezing for later.
They are so fresh and tender when they get frozen this fast.  It will add nice variety to my dinners this winter and it will be tastier than anything that I could buy from the store with the bonus of costing me nearly nothing.  In a few weeks this harvest will soon be over and my freezer will be fuller with many fine veggies from my front yard.

Wednesday, September 13, 2017

Canning Salsa

Fall is fast approaching and I was wondering if I was ever going to be able to make salsa this year.  Last year I had salsa on my shelves by the end of July, but here we are at the beginning of September and I am just now making the first batch of salsa for the year.  The tomatoes have been very slow to start ripening and I have been throwing them into a bag in the freezer as I harvest them.  This week they decided to ripen enough for a whole batch of salsa which calls for 10 cups of tomatoes.

The recipe also calls for 5 cups of sweet peppers.  I used mostly large green bell peppers, but threw in some sweet chili peppers too.

 The 5 cups of onions that went into the salsa were the small or damaged onions from my harvest that needed to be used first.  Preserving them in salsa is a good way to make sure they get used before they go bad so I waste less of my hard earned crops.


This was the first jalapeno harvest of the season and I picked the biggest and thickest ones I could find and chopped up 2 1/2 cups of them and added them to the pot. I also threw in a couple tablespoons of cilantro and salt and topped it all off with apple cider vinegar.


Once I had all the ingredients chopped up and in the pot I started to heat the whole mixture up, stirring it all the while.  It was a colorful batch of salsa fresh from the garden.

After it came to a boil I continued to stir the pot while it simmered for another ten minutes.  While I was preparing the salsa I had set up my canner and jars and they were hot and ready to go by the time the salsa was cooked enough.  One by one I filled the jars and set them back in the canner where they boiled for twenty five minutes.  When time was up I let them cool down for ten more minutes before I removed them from the water bath.  I ended up with eight pints of fresh salsa total (plus one not totally full jar in the fridge) with many more on their way before the season in over.  I think I might need to replenish my pint jar stash soon because the tomatoes are going to start ripening in droves over the next few weeks.  That means there will be lots of salsa and tomato sauce in my future.


Monday, September 11, 2017

Mixing Crops In The Garden

As I have progressed through several years of gardening I like to try little experiments from year to year just to see if there might be a more efficient way of doing things.  Companion planting is something that I have attempted over the years and have learned that some combinations work out better than others when it comes to certain crops.

I have grown several variations on the three sisters planting of corn, beans and squash with various outcomes.  The first year I tried it I laid out a block pattern with patches of corn and beans alternating with spaces filled with squash.  It turns out that my timing was off with some of the plantings so things didn't grow quite the way that I had hoped.  The happiest crop was the corn which grew super tall and shaded out the squash below.  The beans were happy to grow up the corn but I found them very difficult to harvest and decided that shelling beans would be better for this kind of set up.  The squash that grew along the edges of the blocks did ok, but weren't super productive.

Last year I think I found a way of mixing these crops that was better for all of them, but the plan could still use a little tweaking.  The squash was only planted along the front edge of the bed and were given plenty of room to spread out.  They made a great ground cover to keep the weeds at bay once they were well established.  The corn was planted as early as possible and once it came up I planted the beans among them where ever there was a space from a corn seed that didn't germinate.  The corn gets a head start on the beans this way and makes a great trellis for the climbing pole beans that I like to grow.

Another crop that I have experimented with are tomatoes.  The main issue that I have had with tomatoes is that I still haven't found a trellis that I really like for them.  I have done the cheap wire cages and tying them to a stake.  They usually end up overgrowing the trellis and pulling it to the ground defeating the purpose.  This year I am trying the same kind of trellis that I used for my cucumbers last year.  I have chicken wire with two inch holes stretched between t-posts that I drove into the ground.  I have done my best to prune off the lower suckers and secure the growing vines to the fence with baling twine.  This method seems to be working the best so far and there is enough room at the base of the plants that I decided to see if they could happily share the bed with a handful of other crops.  I had planted the basil seedlings that I started this spring along the edge of the tomato bed spacing them several feet apart.  After the second pruning and trellising session with the tomato vines I found I had plenty of space between the basil plants to add in a smattering of carrot seeds.  They will probably grow very slowly in the deep shade beneath the tomatoes but I will leave them in the ground until after the tomatoes die back in the fall.


Carrots are one of those crops that are discreet enough that they can be tucked in just about anywhere there is a little space.  They can stay in the ground well into winter so I don't even have to worry about harvesting them during the busy season of summer.  All I do is sprinkle a few seeds where ever I can find a little room and I will have plenty of hidden treasures to dig up long after the summer garden is gone.  I like to use them to help break up soil in a bed and they also help to bring deeper nutrients in the soil closer to the surface for other crops to use.  They don't interfere with the above ground growth of most crops because they have fern-like leaves that don't grow very tall.  I have planted them in my broccoli beds, alongside my tomatoes and peppers and mixed in with lettuce.  The general rule with carrots seems to be that you have to plant them far enough away from the main crops that they have enough light to get established.  If they get buried under large shady leaves then they will not get very big until the shade is removed.

Lettuce is another crop that can be mixed with other crops if there is room in a bed.  I did sprinkle some lettuce seeds among the corn last year and it did well in the summer heat because of the cool shade of the corn they were growing under.  Lettuce also has a fairly short growing period so it can be used in succession planting to fill in holes in beds, or it can be planted to fill in a bed where an early crop was cleared.  There are so many varieties that the array of leafy patterns can be quite decorative in a vegetable garden.

Saturday, September 9, 2017

Peak Season Garden Tour

The garden has gone into overdrive at this point in the season.  The plants have thoroughly taken over their beds and have been crowding the paths between beds too.  Making my way through the garden now is like a little adventure every morning.  Harvesting has become a daily chore as well.  I usually visit each bed with a large bowl and once I have picked all that I can, I make my way inside to deposit my bounty for further processing.
This was my first attempt at growing watermelons.  They got off to such a bad start this year that I didn't think I was going to get a harvest from this bed, but they surprised me.  After replanting them twice and then watching them stall out for several weeks after they germinated I wound up with two plants which are now growing quite happily.  I think I will get at least three melons from these plants so my efforts here aren't wasted after all.

The summer squash bed has been producing loads of squash for the past month or so, but things have finally started to slow down for this bed.  I have found that my patty pan and yellow squash have become infested with squash bugs and they are slowly but surely dying back.  The zucchini however seem unaffected thus far and are still going strong and giving me one or two squash daily.

The bed of Glass Gem Corn has made an excellent recovery after nearly dying from a watering system malfunction.  They are about five feet tall now and have sent up their tassels.  I do my best to help pollinate them when I find new silks peeking from between the leaves.  I look forward to the colorful harvest that I will get from this bed.
The cucumbers are doing extremely well.  They are spreading so much that they have invaded the beds on either side and would soon take over the garden if I gave them half a chance.  I fill a gallon bag with cucumbers for pickling nearly every day and at this point in the season I have pickled well over thirty quarts of them.  I expect they will keep this up until the frost hits so I still have at least several more weeks of this until I can take a break.

The peppers are quite happy as well.  The plants are heavy with fruit and I have already frozen several gallons of them.  I am saving my next big harvest for when I have enough tomatoes to make a batch of salsa.  Whatever doesn't go into salsa will end up in the freezer and I will be eating fresh peppers well into next year from the looks of things.

The tomatoes have become a massive solid wall of vegetation and have grown taller than the trellis that I have secured them to.  I have given up on trying to train them any longer though I might trim back some of the more unruly ones just so I can walk down the path to harvest them.  They are still ripening very slowly though I am now getting a few each day, though still not enough to make a batch of salsa.  I fear that they will decide to ripen all at once and if that happens I hope I can find the freezer space to take on this many tomatoes.  I have never tried to grow this many tomatoes at once, but apparently I am doing something right from the looks of things.  

These peas were planted after the first onion harvest and so far they look to be growing quite well.  In previous years my attempts at growing fall peas didn't do well because I waited to long to get them into the dirt.  This year I might have gotten the timing right and if I am lucky I will be able to harvest them right around the time that the weather starts to cool.

The green beans are doing very well now that they have filled in the bed.  I had to replant this bed three or four times and was afraid that I wouldn't get very many to freeze for my winter stores.  Thankfully these plants grow quickly and I am now harvesting beans from the seeds that were planted last.  I am very happy with the quality of these beans too.  They grow very long and even when they are large, they remain tender and stringless.  I wasn't going to grow this variety again, but now that they have actually done well, I might consider them for future plantings.

Carrots are the main crop in this bed, though they have been taken over by weeds.  There was supposed to be cabbage on either side of the carrots, but the seedlings that germinated were killed by slugs.  Only two of them survived the slug attack, so I may still get a couple of cabbages out of the deal, but I'm not sure they will finish growing by the time the weather changes. 
The broccoli bed is finally getting around to making broccoli for me.  The plants didn't send up any flower heads until just a few weeks ago.  From the looks of things I will get about nine or ten nice heads of broccoli from this bed.  Broccoli is another crop that I store in the freezer.  I think this crop will be ready soon and will probably get processed in one session just to make my life a little easier. 

Last but not least on this tour is my flower bed.  The irises that were planted this spring have made a full recovery and it looks like they will be here to stay.  The wildflowers that I planted behind them also are doing quite well and have added lots of color to my yard.  I love to look out at see the diversity that I have helped flourish in this small space that I have to work with.  Not only are there plenty of happy, healthy veggies and flowers, but there is also new wildlife in my yard.  I have come across salamanders and toads, all manner of insects and several different species of birds that didn't hang around my yard when I first moved here.  


Thursday, September 7, 2017

Canning Frenzy

This week began with a refrigerator full of cucumbers that needed to addressed.  My schedule hadn't been favorable for canning, so finally after saving cucumbers for five or six days I was able to pickle them.  That one session ended up making 12 quarts of pickles and kept me up until one in the morning to get them finished.

I also had a bag of pears that I bought last weekend at the farmer's market that I had been intending to can all week as well.  That was a simple session since I only had eight pears.  They were perfectly ripe and easy to peel and core and I ended up with three pints of them for later.  The pear crop wasn't very large this year, but I was happy to be able to preserve a little bit of it.

There were frozen bags of apricots and plums that were also waiting to be transformed into jam.  The apricots were from an early summer canning session and the plums were what was left over from making plum wine.  I didn't need all of them for the wine and I didn't want them to go to waste, so they became a batch of plum jam.  In all I ended up with fourteen half pints of plum jam and six half pints of apricot jam.


All of these came to be in just the last few days and there are more to come.  I am already preparing myself for another round of pickles later today and plan to can more peaches in syrup next week.  Once the tomatoes start ripening I will be adding jars of salsa and tomato sauce to my stores as well.  In an effort to clean out the freezer a bit more I will probably be canning more chicken stock here soon too.  I need the freezer space for all the broccoli and green beans that I will be harvesting in the next few weeks.  Canning foods makes them super convenient to use and it is nice to be able to store food without a fridge or freezer.  The only downside is that there is never enough shelf space!

Tuesday, September 5, 2017

Packing Peppers

There are some crops that I grow that need daily upkeep in the peak season to make sure they don't get out of hand.  If the cucumbers or zucchini go too long between harvests they become too big to be tasty so I try to make sure that I pick them often.  Peppers are a nice crop for me because I can let them go for quite a while between harvests.  I often leave good sized peppers on a plant just so they have a chance to really ripen and change into their final color.  However, like any crop, peppers are more productive if you keep them picked, so I do go through and thin out the large ones every few days.  Today was a thinning day and I found an abundance of large peppers on my sweet bell peppers and sweet chili and banana peppers.

The peppers were nicely filled out and had nice thick flesh.  These were all perfect for preserving.  My favorite way to preserve my peppers is to freeze them.  Preparing them for freezing is as simple as cutting them in half and removing the seeds and then throwing them into a ziploc bag.  I don't even blanch my fresh peppers before freezing and they do great.  Once frozen they keep well and getting them ready for cooking is as simple as a rinse under hot water and chopping them into pieces.  I don't chop them before freezing because it can be so time consuming and I often like to make stuffed peppers so having a clean halved pepper ready to go makes things nice and simple for me.  This harvest of peppers filled two gallon ziplocs and they were tightly packed!  They went into the freezer for now and will happily be added to my meals over the coming months.

Saturday, September 2, 2017

Home Grown Dill Pickles

Over the years I have canned so many quarts of dill pickles that going through the steps is becoming second nature for me.  I have the recipe nearly memorized, though I always double check it when I have to double up or halve things for a batch.  This year I am attempting to do frequent small batches so that I can use the cucumbers when they are as fresh as possible.  Every day that I pick cucumbers I put them directly into the fridge for storage until I have enough for a batch.  I can typically get three to four quarts of pickles from filling a gallon bag with cucumbers so that is the size batch I have been doing recently.  I can do larger quantities but saving that many cucumbers really fills the fridge quickly and makes for a long canning session when I get around to them.  I would rather do frequent smaller canning sessions just to keep things more manageable.

Obviously the first step in my pickling adventures involves harvesting the cucumbers.  I generally like to pick them when they are about 3-4 inches long because that is the size that seems to handle canning the best.  Larger cucumbers still get used as long as they are not longer than the jar and they don't have large seeds when I slice them open.  The larger cucumbers don't fit into jars well when they are whole, but I can pack many into a jar if I cut them into spears.

Once enough have been harvested I move on to stage two of the dill pickle making process.  I simply clean each cucumber with a scrub brush and make sure that the flower is removed from the end.  After they are washed I cut the very end off of the cucumbers where the flower was.  This prevents the finished product from having a bitter taste.

Step three involves an overnight soak in a brine solution made simply with pickling salt and water.  I brine my cucumbers in the fridge overnight so they are good and cold when I pack them into the jars for canning.  I think this helps the finished product to be more crisp.  All of the recipes for dill pickles that I have found usually call for them to soak for at least twelve but no more than eighteen hours.  I think less and they won't absorb enough salt and more would make them too salty.  I usually try to get them canned closer to the twelve hour mark to keep things consistent.


Step four is the actual canning process.  Before I ever take the cucumbers out of the fridge I make sure that I have everything set up for canning.  I get my water bath boiling and the jars cooked for at least ten minutes while I prepare everything else.  I mix my pickling solution and bring it to a boil on the stove.  Usually it takes a little while for everything to heat up and that is when I pick my fresh dill and peel garlic cloves to add to the jars for flavor.


  After I get it all prepared I make quick work of packing the jars with as many cucumbers as I can fit along with the dill, garlic and mustard seed for flavor.  Each jar gets topped off with pickling solution and promptly returns to the boiling water bath.  Once every jar is full and back in the canner, I cover the pot and turn up the heat until everything comes to a good boil.  At my altitude I have to boil the quarts of pickles for twenty five minutes to process them properly.  The jars cool down in the canner for ten minutes before they are removed to a counter-top where they continue to cool down and seal overnight.

Once they are cooled down I remove the rings and test the seals of the jars to make sure they are all tight.  These jars will go into storage for the winter and by the looks of things I will have more than enough to last me until next season.  Perhaps I will have to start selling the extras at the local farmers market!