This year I decided it was time to finally go on my first hunting adventure. I was pretty nervous about it. The potential for killing such a large, elegant creature made me quite unsure of myself. After all the years that I have spent taking care of animals, the thought of purposefully ending a life to feed myself was a bit intimidating. I have killed chickens for my freezer, but that was a relatively controlled experience.....tracking an animal through the woods is quite a bit different. I was worried about maiming an animal, but not killing it. I definitely wanted to be sure of a quick kill and I honestly don't think I am a skilled enough marksman to feel confident about doing that successfully. Luckily (or unluckily) for me I never had the opportunity to find out if I could kill an elk this trip. Though we found tracks and other signs from them, I never caught a glimpse of any in the areas that we were hunting in. I did see plenty of other wildlife like mule deer, wild turkeys and grouse along with the usual woodland fare of songbirds and squirrels.
I learned a lot about hunting this trip. I learned more about what I should carry with me and what kind of endurance I need to have to hunt more comfortably. Trying to hike quietly through a forest while carrying a pack and rifle can be quite difficult. My legs became sore in places that I never knew could hurt. My shoulders ached with exhaustion because I wasn't using an entirely appropriate day pack for hunting. I did carry plenty of warm clothing for which I was grateful for in the cooler hours of the day. I also had plenty to snack on when we took breaks throughout the day. Hiking up and down mountainsides has a tendency to fire up your appetite so snacking often helped to keep up my energy levels.
Being my first hunting trip I am not at all surprised that I came home empty handed. I did go with experienced hunters so I felt that I was in good hands and I learned a lot from them over the course of the trip. If anything the experience has inspired me to get out and hike more just to work on my hunting skills. Walking quietly though the forest following game trails and not getting lost is not something that you can learn overnight. I am hoping that when next years hunting season starts I will be better prepared to have a successful hunt.
Monday, October 30, 2017
Thursday, October 19, 2017
Racking the Plum Wine
The first batch of plum wine for the season has been fermenting for well over a month now. It has reached the point where there aren't any more bubbles rising to the surface, so it was ready for the next step. Racking the wine is the process of siphoning off the wine from the "debris" of yeast and tiny fruit pieces that have settled to the bottom of the carboy. This step helps to further clear the wine and prepare it for bottling.
This particular recipe calls for sugar to be added at this stage as well. Fermentation has ended when the alcohol content of the wine is high enough to kill off the yeast. Adding sugar at this point will not restart fermentation, but it will sweeten the wine a bit more. The wine will still need to sit for at least another month to clear completely after this racking.

To begin I simply siphoned the wine into the primary fermenting bucket that was cleaned and sterilized in preparation for this step. Once I siphoned off as much as possible, I added the remaining sugar called for in the recipe and stirred it in until it was fully dissolved. Then I siphoned the wine back into the now clean and sterilized carboy where it will continue to clear until I am ready to bottle it.

I did have a tiny taste of this wine and I think it will make a fantastic bottle of wine after a little more aging. It still carries the sharp yeasty flavor since it was freshly siphoned off of the dead yeast that created it. That taste will go away with time so that is all that I need to give this beautiful batch of wine....time. I hope to be bottling this batch in another month or so and I am still waiting for the late season batch to finish fermenting. It won't be long until my shelves are full of wine bottles too!
Sunday, October 15, 2017
Using Every Little Bit: Apple Juice From Skins and Cores
Canning my own food can be a time consuming process, but the payoff is that I know exactly what is in the food that I eat. The main point of canning for me is to preserve the fruits of my labor for the coming months so that my effort in the garden isn't wasted. I also buy some of my food from local farmers (mostly fruit because I grow my own vegetables). When I spend money on food I want to be extra sure to not waste any of that either.


This year when I was processing a box of apples into apple sauce and apple pie filling I came across instructions on how to make homemade apple juice using the "waste products" of apple canning - the skins and cores. I was intrigued by this since my apple pie filling called for unsweetened apple juice and I didn't want to buy some if I didn't need to.

The recipe is simple enough: add skins and cores to a large saucepan and just cover with water. Bring to a boil, then reduce heat to a simmer for 30 minutes. After straining out the skins and cores I was surprised to find that my apples made pink juice! The red apple skins must have changed the color of the juice while they were cooking. The juice was plenty sweet without adding any sugar and I now had more than enough for my apple pie filling recipe.

I made a second batch of juice with the peelings from the apple pie filling and might try to make some apple jelly or maybe a small batch of apple wine to round things out with my bonus free apple juice. Also in the theme of wasting less, the spent skins and cores will go on to become chicken snacks which saves me a little money on food for them too.
For the record this box of apples cost me $26 and gave me eleven pints of applesauce, 8 pints of apple pie filling and 3/4 gallon of apple juice. The juice will probably make at least 8 half pints of jelly with a little left over for sipping. Not bad for a days work. Now if only I was growing my own apples too!
Thursday, October 12, 2017
Chicken Socialization
The three chicks that hatched in July have been growing steadily. These were the chicks that had the sweet rooster as a father and I have made a point to handle them everyday. They seem to share is his friendly disposition so raising this batch of chicks has been a lot of fun. There is one in particular that seems to love my attention. She always come running every time I open their pen and flies up to say hello. She tends to snuggle into my lap for a few minutes and actually seems to enjoy being petted. I have to say that even though the rooster was sweet, he never went out of his way to snuggle like this.

I try to not get attached to the chickens but I can make an exception for a sweet hen. She won't ever be a true pet, but she might get a free card to live out her days if she remains this friendly. Besides, who wouldn't want a calm, friendly genetic line in their flock?

I try to not get attached to the chickens but I can make an exception for a sweet hen. She won't ever be a true pet, but she might get a free card to live out her days if she remains this friendly. Besides, who wouldn't want a calm, friendly genetic line in their flock?
Tuesday, October 10, 2017
Taking Stock of My Stores
Since the busy canning season has drawn to a close with the coming of the first frost I thought it would be a good time to tally up what I had stored for the winter. I am trying to see how long my stored food will last me and it's helpful to know how much I started with. In canned items I have quite a variety of things with a few more to be added as time allows this winter.
 There are 12 half pints of plum jam, 13 half pints of apricot jam, 3 half pints of peach jam 24 quarter pints of pepper jelly (not pictured here), 1 half pint of blackberry jam (a gift from the neighbor), and one quarter pint of cherry preserves (a gift from a co worker).


Jellies and jams:

Canned fruit:

My canned fruit collection consists of 10 pints of pears, 13 pints of peaches, 4 pints of apricot halves, 8 pints of apple pie filling, and 11 pints of applesauce.
Salsa:

I only canned red salsa this year as I didn't get any tomatillos for salsa verde this year. I ended up with a grand total of 35 pints. I think this is more than enough for me for the year but I may end up making one more batch just to use up more peppers. I have so many that I don't know what to do with all of them!
Pickles:

My stores of pickles are very well rounded due to my love of dill pickles. I canned over fifty quarts of them this year though I have already given some away. I still had a few jars left over from last year so I plan on eating those first. Pictured here is my entire stash of 62 quarts of dill pickles. That ought to get me through to the next growing season I hope!
Not pictured are 18 quarts of chicken stock and 6 pints of last years tomato sauce. I will be adding to the tomato sauce stores over the next few weeks as I find time to turn my frozen tomatoes into sauce. I also have 6 quart jars of dried zucchini, 2 quarts of dried apricots, and 12 bottles of cherry wine. My wine stash will be rounded out in a couple more months when my 7 gallons of plum wine are ready for bottling.
Other things that I have in "storage" are crops like my potatoes, carrots and parsnips which are still in the ground. These crops I will harvest as I need them over the winter. They keep better in the ground and with the mild winters we have here I should be able to harvest them periodically as I need them.
I also finished curing my onions and shallots so they were all trimmed up and added to my pantry shelves

I ended up with a little over 4 lbs of shallots, 9 lbs of red onions, and nearly 32 lbs of yellow onions. I find this quite impressive knowing that I used several pounds to make my salsa and I have been eating the "use first" ones for many weeks now. If I had to guess, I would bet that my whole onion harvest was nearly 60 lbs.
The freezer tally was a little more difficult to get as I had to dig everything out to see what I had. At this point in the season I have about 30 quarts of green beans, 32 quarts of broccoli, 5 gallon bags stuffed full with peppers and 4 1/2 gallon bags holding tomatoes for sauce making. I also found pork bones that need to be made into stock and many more meals of pork and chicken from my butchering adventures last winter.
I guess you could say that I am well stocked up for winter as far as my pantry goes. It really hits home how much time I put into my garden when I see the stacks of produce that I have stored up over the course of the growing season. I am very happy with this year's tally. I think this is probably one of my most successful years yet and I know that there is still more to learn that will help make my future gardens even better.
Sunday, October 8, 2017
Pepper Jelly
This year I have harvested more peppers than I know what to do with. So far I have made 32 pints of salsa, dried some sliced and whole peppers, frozen five gallon bags literally stuffed with halved peppers and have been eating them fresh as often as I can. I still have a box full of them on my counter awaiting processing. While I will probably end up dehydrating more of them, I thought I might try preserving them in yet another form: pepper jelly.
The basic recipe is "Green Pepper Jelly" in the Ball Canning Book. I had a variety of colors of sweet bell peppers so I thought I would make a batch of each color. The first step is to put the peppers through a blender to extract the juice for jelly. The pulp drains through a jelly bag and I used 1 1/2 cups of juice for each batch of jelly.
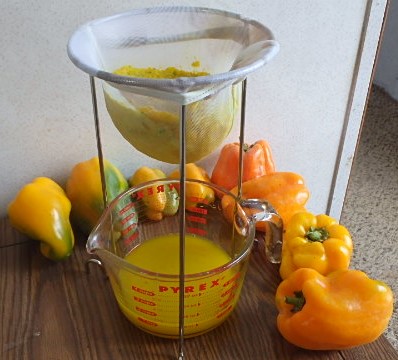


The basic recipe is "Green Pepper Jelly" in the Ball Canning Book. I had a variety of colors of sweet bell peppers so I thought I would make a batch of each color. The first step is to put the peppers through a blender to extract the juice for jelly. The pulp drains through a jelly bag and I used 1 1/2 cups of juice for each batch of jelly.

The next step is to mix the juice with vinegar, lemon juice and pectin and bring it to a boil.

Once boiling, the sugar is added and the mixture needs to be stirred constantly for one minute. When the jelly begins to gel, I remove it from heat and quickly skim the foam from the top. From there it goes into hot jelly jars and then back into the water bath to boil for 20 minutes.

When it's done I take the jars out and let them cool for several hours. Each color pepper made a beautiful jelly, and every batch tasted great!


The book says that this is a savory jelly, but it is sweet enough that I would use it on toast too! I also imagine that it would make a delicious glaze on roasted chicken or pork. These jellies are so pretty that I might just add them to gift baskets for the holidays too.

Friday, October 6, 2017
Sweet Cherry Wine Bottling
It has been over two months since I brought home forty pounds of cherries to make into wine. I washed, pitted and stemmed them all, mixed them with sugar and yeast (and a few other things) and set them in a fermenting bucket for a week. After that I strained the mix into my glass carboy where it continued to ferment for a month. Once the bubbling slowed way down, I mixed a little more sugar into the batch and then racked it into another carboy where it could finish fermenting over the next month. Finally the time had come to bottle the wine. The fermentation had been stopped for well over three weeks and the wine looked dark and clear in the carboy.
The final step was bottling the wine. The actual bottling isn't very hard - just siphon wine out of carboy and into bottles and cork and done. Its the work that takes place before this part that is most important. I make sure that every bottle is clean inside by washing them in hot soapy water and rinse them out well. Then I pour boiling water into each bottle to do a final sterilization before adding the wine.
This wine is a beautiful ruby color and is very fragrant and sweet. It already has good flavor and that should only improve with time.

In total I ended up with twenty-nine full bottles of sweet cherry wine. Twelve of them will be going to pay back the two investors that gave me money up front to pay for the cherries. The rest will be stored in a cool dark place where they can continue to age until I get around to sharing them with friends. In all the cost of the wine was around $115 for the cherries and sugar which comes out to just under $4 a bottle.....not necessarily cheaper than the cheapest wine you can buy, but infinitely better. Cheers!

The final step was bottling the wine. The actual bottling isn't very hard - just siphon wine out of carboy and into bottles and cork and done. Its the work that takes place before this part that is most important. I make sure that every bottle is clean inside by washing them in hot soapy water and rinse them out well. Then I pour boiling water into each bottle to do a final sterilization before adding the wine.
This wine is a beautiful ruby color and is very fragrant and sweet. It already has good flavor and that should only improve with time.


Wednesday, October 4, 2017
Fall Color Tour
Autumn is in the air around here and the trees everywhere are starting to put out their colorful fall garb.


I ended up in Silverton and followed the main road up the little valley to the end of town. The town is surrounded by beautiful peaks and a small creek runs through the center of it all adding character to the idyllic scene.


The drive back was just a beautiful as the drive up and I stopped several places along the way to enjoy the fleeting beauty that is autumn.
Sunday, October 1, 2017
Preserving Pears
Last week I had the good fortune of finding some late season pears for sale at the local farmer's market. They were still fairly green at the time, so I let them sit in my kitchen for a week so they could ripen a bit more. This weekend I decided that I should process those pears since I had a little time that I could devote to that.
The recipe that I used was from the Ball Canning Book: Pears in Light Syrup. I have used this recipe in the past and I like it for it's simplicity. I set up the canner and jars and started heating them up while I prepared the pears for canning. One by one each pear was peeled, cored and sliced into a lemon juice dip that helps to prevent browning. Once I had prepared enough pears I mixed up a batch of light syrup and brought it to a boil on the stove. For this round of canning I used the hot pack method and cooked the pears in the syrup for about five minutes before packing them into jars and covering them with the syrup. After filling the jars they went back into the canner and were processed for thirty minutes. I ended up with seven pints of canned pears to add to my stores and look forward to snacking on the sweet treats in the months to come.

The recipe that I used was from the Ball Canning Book: Pears in Light Syrup. I have used this recipe in the past and I like it for it's simplicity. I set up the canner and jars and started heating them up while I prepared the pears for canning. One by one each pear was peeled, cored and sliced into a lemon juice dip that helps to prevent browning. Once I had prepared enough pears I mixed up a batch of light syrup and brought it to a boil on the stove. For this round of canning I used the hot pack method and cooked the pears in the syrup for about five minutes before packing them into jars and covering them with the syrup. After filling the jars they went back into the canner and were processed for thirty minutes. I ended up with seven pints of canned pears to add to my stores and look forward to snacking on the sweet treats in the months to come.

Subscribe to:
Comments (Atom)