Last time I went to the grocery store I came across a couple of gallons of fresh apple cider. I wanted to make some apple wine this fall and I finally had my opportunity. The apple cider was pasteurized, but didn't have any preservatives that would interfere with the fermentation process, so I bought them on the spot and gleefully took home my prize. For less than $20 I will be able to make at least 7 bottles of delicious wine!
For the basic recipe I did a very short Internet search and came across this recipe:
How to Make Apple Wine. I already had everything I needed from my previous experiments in wine making. The only thing I changed was the amount of sugar I used. I determined that what I thought were full gallons of apple wine were only 3/4 of a gallon, so I adjusted the recipe to make 1 1/2 gallons of wine instead of 2. I mixed everything but the yeast in my largest stainless steel bowl, stirring until everything dissolved in the cider. I covered this with a clean cloth and will let it sit for 24 hours before I add the yeast. Five days after I add the yeast I will then transfer the fermenting cider to my glass carboys where they will ferment until they use up all the sugar in the cider. In only a couple of months I will be bottling my first batch of apple cider wine!
Wednesday, December 23, 2015
Thursday, December 17, 2015
Investing in Garden Futures
So the holidays are drawing near and all I can think about is that there are only a few more days until the days start getting longer again. I'm so excited for spring to get here and soon it will be time to get started on planting seeds for the garden. This is one of the best times of the year - when the seed catalogs arrive and I can spend hours reading plant descriptions and dreaming of next summer's garden abundance.
I have made a quick inventory of seeds that I already had so I didn't buy seeds that I don't need. I usually get rid of seeds that are more than 4 years old just because the germination can become spotty and I don't have a lot of room under the lights for empty pots. Then I look over what types of veggies I want to have in the garden beds. This is where the seed catalogs make things interesting. I don't just grow carrots.....there are dozens of types of carrots I can choose from. I usually try to choose varieties that would grow well in my climate, or have a short growing season to make crop rotation efficient. Each type of veggie has thier own sets of strengths and weaknesses and I try to choose types of plants that would complement each other well. For example, I choose to grow a very tall variety of corn that acts as a sturdy support for the tangle of pole bean vines that I plant beside them.
I have a fairly definite plan of what I want to grow and where I want to grow it in my garden, but I always seem to order more seeds than I made room for in the garden. This is where the rest of my yard comes in. I want to try to grow small amounts of grain alternative crops such as quinoa and amaranth in parts of my yard that I don't have dedicated to veggie beds. I am trying these grains because they are more drought tolerant than others which is important in my semi arid climate. I don't want to have to use a ton of water to grow these crops, and I'm hoping to use them to supplement my chicken feed eventually.
There is also going to be a gray zone around the garden where I will allow for the overflow growth of my vining plants like squash, melons and cucumbers. This is an area that I can plant with a low growing cover crop to protect the soil until the vining plants can fill in the area. This is also an area that I can allow my chickens to roam in when I no longer want them tearing up the garden beds for me.
I plan on adding an herb patch to the yard in the spring, though I will probably get some herbs as starts from the local nursery since I tend to have a hard time getting herb seeds to germinate for me. I also plan on planting out a small strawberry patch this spring. This is one of the few perennials that I am willing to plant on a rental property - since they produce fruit fairly quickly, are low maintenance and I can take cuttings with me when I move if I so desire.
I have so much to do this spring to get this garden started that I am impatiently waiting for the season to arrive. I have so many ideas in my head for what I want to do with the yard, I can't wait to get started implementing them and seeing how they work.
Monday, December 14, 2015
Introducing My Etsy Shop
Hi all! Just wanted to share with you that I have taken the plunge and opened my own Etsy shop. You can find my hand made items here: The Handspun Homestead
Feel free to take a look at my collection of warm winter hats, scarfs, and cowls. All were crocheted by me and some even have the added blessing of using yarn that was spun by my hand as well! As I complete more projects I will be adding to the inventory of the store. I am also considering making special order items, though depending on the order, the time frame for delivery could have quite a range....I am after all only one person, and I do work a full time job which doesn't leave much time for crafting. Just contact me through my etsy shop and perhaps we could work out a deal. Thanks for looking!
Feel free to take a look at my collection of warm winter hats, scarfs, and cowls. All were crocheted by me and some even have the added blessing of using yarn that was spun by my hand as well! As I complete more projects I will be adding to the inventory of the store. I am also considering making special order items, though depending on the order, the time frame for delivery could have quite a range....I am after all only one person, and I do work a full time job which doesn't leave much time for crafting. Just contact me through my etsy shop and perhaps we could work out a deal. Thanks for looking!
Saturday, December 12, 2015
Creating A Portable Chicken Coop
I have been thinking about the different ways I could put together a chicken coop. I have looked at many plans for chicken coops and the variety is endless. After giving it some thought I decided that I want a chicken coop that isn't very big, and is easy to move. I only plan on having 6 or 7 chickens in the beginning, so a small coop will work fine. I may build a second coop for future meat bird rearing, but for now I am mostly focused on getting a small laying operation started. I also want to make sure that the coop is predator proof. I want the coop to be able to move independently of the run that I will attach to the side in order to make the whole thing lighter for me. I also want it to be fairly easy to clean out, so I want a solid floor and a large door for easy access.
My hunt for materials was short lived. A friend of a friend was moving and was going to leave behind some useful materials, so he didn't seem to mind donating them for my chicken coop. There was a well built nest box with a solid back and six nesting spaces and more pallets than I could use, so we took as many as would fit in my friends truck.
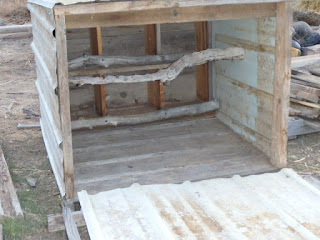
My original plan had involved breaking down the pallets and rebuilding them into walls and doors (which is very labor intensive and time consuming). My friend had a better idea, which involves less pallet deconstruction (those things aren't meant to come apart easily!). Since the pallets were already a good size being 4'x 4' we decided to just use one of the pallets as a foundation for the coop and filled in the slats of the pallet with other pallet boards to make a solid floor. By some stroke of luck, the nest box fit perfectly on one side of the pallet to make an entire wall for the coop. To make accessing the eggs easy, we removed one of the boards from the back of the nest box and reattached it with hinges. The latches to hold this new door closed were simply made from cutting up a tree branch and screwing it into place.
The other walls were going to be more of a challenge until I remembered that I had found some sheet metal siding laying on the side of my house that was left there by previous tenants. A quick inspection and some measuring revealed another stroke of luck. The sheets were almost a perfect match for the dimensions of the pallet, and there were enough pieces for all the remaining walls and the roof. First we attached the two side walls to either side of the nest box. The sheet metal was sturdy enough that we only needed to minimally frame out the open end of the box. The open end will become the large access door(s?) so I can easily clean out the floor of the coop. Then we used another large branch to make a roost inside the coop. Once that was secured we then framed out the support for the sheet of metal that was to become the roof. There is a slight slant for the roof so water can run off easily.


My hunt for materials was short lived. A friend of a friend was moving and was going to leave behind some useful materials, so he didn't seem to mind donating them for my chicken coop. There was a well built nest box with a solid back and six nesting spaces and more pallets than I could use, so we took as many as would fit in my friends truck.
My original plan had involved breaking down the pallets and rebuilding them into walls and doors (which is very labor intensive and time consuming). My friend had a better idea, which involves less pallet deconstruction (those things aren't meant to come apart easily!). Since the pallets were already a good size being 4'x 4' we decided to just use one of the pallets as a foundation for the coop and filled in the slats of the pallet with other pallet boards to make a solid floor. By some stroke of luck, the nest box fit perfectly on one side of the pallet to make an entire wall for the coop. To make accessing the eggs easy, we removed one of the boards from the back of the nest box and reattached it with hinges. The latches to hold this new door closed were simply made from cutting up a tree branch and screwing it into place.
The other walls were going to be more of a challenge until I remembered that I had found some sheet metal siding laying on the side of my house that was left there by previous tenants. A quick inspection and some measuring revealed another stroke of luck. The sheets were almost a perfect match for the dimensions of the pallet, and there were enough pieces for all the remaining walls and the roof. First we attached the two side walls to either side of the nest box. The sheet metal was sturdy enough that we only needed to minimally frame out the open end of the box. The open end will become the large access door(s?) so I can easily clean out the floor of the coop. Then we used another large branch to make a roost inside the coop. Once that was secured we then framed out the support for the sheet of metal that was to become the roof. There is a slight slant for the roof so water can run off easily.


The next step will be to cut a hole on one of the sides to allow the chickens to access their run. The final touch will be adding the large access door to the open side of the coop. Eventually I would also like to add some wheels to the end to make moving the coop an easy job. All in all I am very pleased at the progress that has been made on my chicken coop. It is definitely a sturdy structure and will provide good shelter for my chickens. I think I will also be able to add a heat lamp on the inside if I need to for my younger chickens. I'm not too worried about the metal walls catching fire and there is plenty of space on the inside. Only a few more months until chicken season!
Subscribe to:
Comments (Atom)