My hunt for materials was short lived. A friend of a friend was moving and was going to leave behind some useful materials, so he didn't seem to mind donating them for my chicken coop. There was a well built nest box with a solid back and six nesting spaces and more pallets than I could use, so we took as many as would fit in my friends truck.
My original plan had involved breaking down the pallets and rebuilding them into walls and doors (which is very labor intensive and time consuming). My friend had a better idea, which involves less pallet deconstruction (those things aren't meant to come apart easily!). Since the pallets were already a good size being 4'x 4' we decided to just use one of the pallets as a foundation for the coop and filled in the slats of the pallet with other pallet boards to make a solid floor. By some stroke of luck, the nest box fit perfectly on one side of the pallet to make an entire wall for the coop. To make accessing the eggs easy, we removed one of the boards from the back of the nest box and reattached it with hinges. The latches to hold this new door closed were simply made from cutting up a tree branch and screwing it into place.
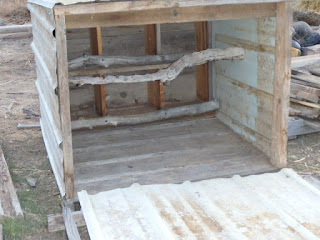
The other walls were going to be more of a challenge until I remembered that I had found some sheet metal siding laying on the side of my house that was left there by previous tenants. A quick inspection and some measuring revealed another stroke of luck. The sheets were almost a perfect match for the dimensions of the pallet, and there were enough pieces for all the remaining walls and the roof. First we attached the two side walls to either side of the nest box. The sheet metal was sturdy enough that we only needed to minimally frame out the open end of the box. The open end will become the large access door(s?) so I can easily clean out the floor of the coop. Then we used another large branch to make a roost inside the coop. Once that was secured we then framed out the support for the sheet of metal that was to become the roof. There is a slight slant for the roof so water can run off easily.
The next step will be to cut a hole on one of the sides to allow the chickens to access their run. The final touch will be adding the large access door to the open side of the coop. Eventually I would also like to add some wheels to the end to make moving the coop an easy job. All in all I am very pleased at the progress that has been made on my chicken coop. It is definitely a sturdy structure and will provide good shelter for my chickens. I think I will also be able to add a heat lamp on the inside if I need to for my younger chickens. I'm not too worried about the metal walls catching fire and there is plenty of space on the inside. Only a few more months until chicken season!


No comments:
Post a Comment