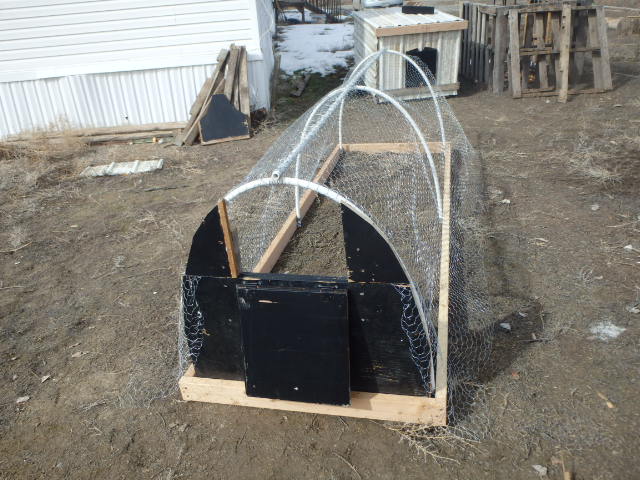
The run is going to double as a hoop house so I designed it to be the same size as my garden beds. While I don't think I am going to use them in the garden this summer, they can certainly assist me in the fall clean up of the beds when that time comes. The bottom frame was built from three 10 ft 2x4's, one for each long side and one cut to fit the shorter ends of the structure. The main supports are simply 1/2 inch pvc pipe cut to about seven feet long and held in place by pipe straps secured to the bottom frame. I also used one full length of pipe for the back bone of the hoop run. I secured it to the hoops by drilling a hole through each end and attaching it the hoops with wire.

To the frame I attached 1 inch chicken wire fencing, securing it with galvanized wire to the pvc frame. For now I am allowing the extra chicken wire to flare out at the bottom of the run to deter digging predators and may even pin this to the ground for additional protection. In the future I may run a solar powered electric wire around the enclosure for protection if needed. I have also left a flare on the end to make closing off the end of the run easier.

One end of the run was filled in with some salvage lumber from a bathroom remodel next door. Some cabinet doors and a painted piece of plywood were cut to fit the arch of the run and secured to the base frame with some screws. There is a small access door in the top of the run, so I can change out food and water dishes from this side.

Two smaller pieces were used to close the gaps between the access door and the fenced sides of the run. The door does stand out above the top of the run when it is closed, but that will make it easy to secure with a wire latch.
The last step for completing the hoop run is to staple the chicken wire securely to the base frame.
I might also attach some handles and some wheels in the future to make it easier to move, but for right now I think it will be plenty functional. The open end will be attached to the coop, and I will probably cover one end of the run with a tarp to provide shade and some extra protection from the elements.
Overall this little project cost me less then $50. The lumber was about $12, The pvc pipe, wire and fasteners were about $12, and the chicken wire was $25 for a 25 ft roll. Considering that the coop was free aside from a box of screws, I am pretty happy with the cost of this little endeavor. If it proves to be a predator proof enclosure, It would be simple enough to build a few more to increase the size of my flock in the future.
No comments:
Post a Comment