Hi all! Just wanted to share with you that I have taken the plunge and opened my own Etsy shop. You can find my hand made items here: The Handspun Homestead
Feel free to take a look at my collection of warm winter hats, scarfs, and cowls. All were crocheted by me and some even have the added blessing of using yarn that was spun by my hand as well! As I complete more projects I will be adding to the inventory of the store. I am also considering making special order items, though depending on the order, the time frame for delivery could have quite a range....I am after all only one person, and I do work a full time job which doesn't leave much time for crafting. Just contact me through my etsy shop and perhaps we could work out a deal. Thanks for looking!
Monday, December 14, 2015

Saturday, December 12, 2015
Creating A Portable Chicken Coop
I have been thinking about the different ways I could put together a chicken coop. I have looked at many plans for chicken coops and the variety is endless. After giving it some thought I decided that I want a chicken coop that isn't very big, and is easy to move. I only plan on having 6 or 7 chickens in the beginning, so a small coop will work fine. I may build a second coop for future meat bird rearing, but for now I am mostly focused on getting a small laying operation started. I also want to make sure that the coop is predator proof. I want the coop to be able to move independently of the run that I will attach to the side in order to make the whole thing lighter for me. I also want it to be fairly easy to clean out, so I want a solid floor and a large door for easy access.
My hunt for materials was short lived. A friend of a friend was moving and was going to leave behind some useful materials, so he didn't seem to mind donating them for my chicken coop. There was a well built nest box with a solid back and six nesting spaces and more pallets than I could use, so we took as many as would fit in my friends truck.
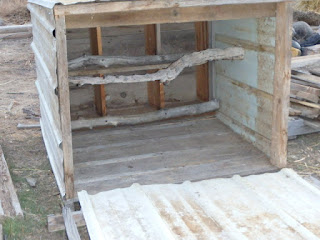
My original plan had involved breaking down the pallets and rebuilding them into walls and doors (which is very labor intensive and time consuming). My friend had a better idea, which involves less pallet deconstruction (those things aren't meant to come apart easily!). Since the pallets were already a good size being 4'x 4' we decided to just use one of the pallets as a foundation for the coop and filled in the slats of the pallet with other pallet boards to make a solid floor. By some stroke of luck, the nest box fit perfectly on one side of the pallet to make an entire wall for the coop. To make accessing the eggs easy, we removed one of the boards from the back of the nest box and reattached it with hinges. The latches to hold this new door closed were simply made from cutting up a tree branch and screwing it into place.
The other walls were going to be more of a challenge until I remembered that I had found some sheet metal siding laying on the side of my house that was left there by previous tenants. A quick inspection and some measuring revealed another stroke of luck. The sheets were almost a perfect match for the dimensions of the pallet, and there were enough pieces for all the remaining walls and the roof. First we attached the two side walls to either side of the nest box. The sheet metal was sturdy enough that we only needed to minimally frame out the open end of the box. The open end will become the large access door(s?) so I can easily clean out the floor of the coop. Then we used another large branch to make a roost inside the coop. Once that was secured we then framed out the support for the sheet of metal that was to become the roof. There is a slight slant for the roof so water can run off easily.


My hunt for materials was short lived. A friend of a friend was moving and was going to leave behind some useful materials, so he didn't seem to mind donating them for my chicken coop. There was a well built nest box with a solid back and six nesting spaces and more pallets than I could use, so we took as many as would fit in my friends truck.
My original plan had involved breaking down the pallets and rebuilding them into walls and doors (which is very labor intensive and time consuming). My friend had a better idea, which involves less pallet deconstruction (those things aren't meant to come apart easily!). Since the pallets were already a good size being 4'x 4' we decided to just use one of the pallets as a foundation for the coop and filled in the slats of the pallet with other pallet boards to make a solid floor. By some stroke of luck, the nest box fit perfectly on one side of the pallet to make an entire wall for the coop. To make accessing the eggs easy, we removed one of the boards from the back of the nest box and reattached it with hinges. The latches to hold this new door closed were simply made from cutting up a tree branch and screwing it into place.
The other walls were going to be more of a challenge until I remembered that I had found some sheet metal siding laying on the side of my house that was left there by previous tenants. A quick inspection and some measuring revealed another stroke of luck. The sheets were almost a perfect match for the dimensions of the pallet, and there were enough pieces for all the remaining walls and the roof. First we attached the two side walls to either side of the nest box. The sheet metal was sturdy enough that we only needed to minimally frame out the open end of the box. The open end will become the large access door(s?) so I can easily clean out the floor of the coop. Then we used another large branch to make a roost inside the coop. Once that was secured we then framed out the support for the sheet of metal that was to become the roof. There is a slight slant for the roof so water can run off easily.


The next step will be to cut a hole on one of the sides to allow the chickens to access their run. The final touch will be adding the large access door to the open side of the coop. Eventually I would also like to add some wheels to the end to make moving the coop an easy job. All in all I am very pleased at the progress that has been made on my chicken coop. It is definitely a sturdy structure and will provide good shelter for my chickens. I think I will also be able to add a heat lamp on the inside if I need to for my younger chickens. I'm not too worried about the metal walls catching fire and there is plenty of space on the inside. Only a few more months until chicken season!
Saturday, November 28, 2015
The First of Many Dye Experiments
Finally I have all that I need to dye my first batch of roving and yarn. Since I am using merino wool roving for dyeing, I went with an acid dye since those work best on protein fibers (which is what wool is). I didn't want to spend a ton of money on learning how to dye, so I ordered a basic starter kit of Jacquard acid dyes. This came with the three primary colors of blue, yellow and red, and the color black. I figured that I could make pretty much any color I wanted with those colors so it seemed like a good place to start. The kit also came with one pound of citric acid crystals to use as a mordant.
The method of dyeing that I decided to go with was to "paint" the roving and yarn with dyes mixed in a yorker bottle. This way I have a little more control over what color goes where when I am using multiple colors at the same time. It also made it very easy to mix colors.


The method of dyeing that I decided to go with was to "paint" the roving and yarn with dyes mixed in a yorker bottle. This way I have a little more control over what color goes where when I am using multiple colors at the same time. It also made it very easy to mix colors.

This was all that I need to make a beautiful array of colors for my future yarn: roving, dye, mixing bottles, saran wrap, rubber gloves, a funnel and a rice steamer.
The first step was to protect my workspace with layers of newspaper. The dye splatters easily and I don't want stained counter tops or floors. Over the paper towels, I laid out a fairly long stretch of saran wrap. Then I measured out several 4 oz lengths of roving. My spinning wheel can only hold up to 4 oz at a time so that is why I use that amount. Then I filled a bowl with water and submerged the roving. I let the roving soak for 20-30 minutes while I prepared the different dyes that I wanted to use.
To prepare the dye I heated up some water in my tea pot until it was just boiling. Then I used the funnel to measure out my dyes into the yorker bottles. The amount of dye needed just depends on how dark I wanted the colors to be. Once the dye was in the bottle, I carefully added the hot water to the 4 oz mark on the bottle. Then I topped the bottle off the rest of the way with white vinegar and shook the whole thing to mix it up. There are many different ways that you can use your mordants. Some people soak their roving in the mordants mixed with water. Other people mix them directly with the dye itself. I don't think that it matters all that much which way you do it, as long as you use enough to make the dye stick.
In my first attempt I wanted to make roving with autumn colors, so I choose red, yellow and orange. This was a great combination to work with since orange made a nice gradient of color change between the red and yellow. I layed the wrung out roving on top of the saran wrap and arranged it into one flat layer. Then the dyeing begins. Starting at one end of the roving I squirted the red dye in a zig zag pattern across the width of the layer. Then I squished the dye into the roving to make sure that it was saturating the entire fiber. I followed the red dye with orange, and finally with yellow. Once I was sure that the roving was thoroughly saturated with dye, I covered the entire thing with another layer of saran wrap and rolled it into a tight log. I then placed the rolled up roving into the rice steamer and let it steam for 30 minutes. The heat helps to fix the dye colors to the fiber.
When the roving was done steaming I took it out and let it cool for a few minutes while I prepared the next batch for dyeing. When it was cool enough to handle with the gloves on I unwrapped the roving and rinsed it under the hottest water I could stand. You have to be a little careful when rinsing roving because if you change the temperature too much, you can cause felting which makes the roving unspinnable. Once the rinse water ran clear, I wrung out the roving one last time and then hung it up to dry.

Here are two future skeins of fiery colored yarn! Can't wait for it to dry so I can get to spinning it up!
Wednesday, November 25, 2015
Chicken Dreams
A couple of years ago I lived on a property that allowed me to have chickens. When I left there I couldn't take them with me and I have had some serious chicken withdrawal to deal with. I miss being able to gather fresh eggs (still warm) and cook up the best breakfasts I have ever had. I miss their silly antics and "grasshopper football". I also miss having a place to put my kitchen scraps without feeling like I am wasting useful material.
Happily I have moved to a place that will allow me the joys of chicken keeping once again. The only obstacle to chicken ownership is that I don't have an area to house them yet. I will probably let them free range a little bit when I can be outside keeping an eye on them, but for the most part I want to house them in some type of chicken tractor. I toyed with the idea of building a coop and a stationary pen, but I wanted to allow them to have a more flexible set up. I think I will make the run portion of the tractor the same size as a garden bed. This way I can use the chickens efficiently to fertilize and weed my garden. The coop area will attach to one end of the run and will provide nest boxes, shelter and protection from predators. I have seen quite a few foxes in my area so I will need to make the coops and runs fairly sturdy.
I have been researching the various ways to build efficient chicken tractors. The PVC pipe framed runs make the most sense economically, though I worry about their strength. The upside to PVC pipe is that the chicken run could double as a hoop house for my vegetable beds as well. Wood framed runs would be sturdier, but they would also be a lot heavier, which could make moving them more difficult. I am going to try to find some salvage materials to build the coop for the chickens. I like the idea of keeping costs down while reducing waste at the same time. I was thinking about using pallets to build the coop itself. That wood is fairly sturdy, and many places give pallets away for free.
The last, but most important decision I need to make is how many chickens do I want to have. The last time I had chickens, I mainly only used them for eggs. The only chickens I ate were the roosters, and I only had two of the course of several years. I don't think I ever had more than ten chickens at a time either. This time around I am toying with the idea of raising some chickens for meat. I'm not fond of the idea of growing out the frankenchickens that are normally raised for meat purposes, so I am leaning towards getting dual purpose breeds of chicken. I know they take a little longer to reach eating size, but I want my chickens to be healthy so they can lead happy chicken lives.
I think that I will probably keep a main laying flock of four or five birds and then raise small batches of chickens for meat birds throughout the year. Raising them in small batches will help keep my feed costs manageable, as well as making butchering day less stressful for me. I am debating on weather or not I want to keep a rooster. Roosters can be real jerks, and they can stress out the ladies if they are overzealous in their mating habits. The chickens also won't be far from the house, and the idea of waking up to a rooster at 4 in the morning isn't as nostalgic as it sounds.....roosters can be irritating when you appreciate your sleep.
I will be putting some time into this project in the coming months and will keep you posted on the progress. First step will be planning out the finer details of things. Then I will gather my materials and weather permitting, get the chicken tractor ready for chicks by spring. I can't wait to have chickens again!
Sunday, November 22, 2015
Starting my Foray into Dyeing
I have been spinning roving for a couple years now and I have always been a fan of using colored rovings, but have never dyed any myself. This changed this year when a friend introduced me to the world of dying. The pieces I dyed in my lesson with her spun up beautifully and I couldn't get the idea of creating my own color combinations out of my head.
I recently "invested" a small amount of money into supplies for my new dying adventure. I found a rice steamer at a local thrift shop for $5.00 and I was able to order a bag of 4oz. yorker bottles through my real job for only $10.00. I ordered a pound of merino/tussah roving for a fairly cheap price of $33.00, and I ordered a dyeing starter kit for another $33.00. For under $100 I am now fully prepared to start exploring the world of hand dyed fiber.
I have also been spinning a plain white yarn from 100% merino roving. I want to compare how spun yarn dyes compared to the roving. I am going to try to be organized about this whole learning process. I have bought a notebook specifically for taking notes on color, fiber type, and mordant used to help me learn about dyeing.
I recently "invested" a small amount of money into supplies for my new dying adventure. I found a rice steamer at a local thrift shop for $5.00 and I was able to order a bag of 4oz. yorker bottles through my real job for only $10.00. I ordered a pound of merino/tussah roving for a fairly cheap price of $33.00, and I ordered a dyeing starter kit for another $33.00. For under $100 I am now fully prepared to start exploring the world of hand dyed fiber.
I have also been spinning a plain white yarn from 100% merino roving. I want to compare how spun yarn dyes compared to the roving. I am going to try to be organized about this whole learning process. I have bought a notebook specifically for taking notes on color, fiber type, and mordant used to help me learn about dyeing.
Thursday, November 19, 2015
Things I do to Reduce Energy Consumption
Since I make a point of trying to live a frugal lifestyle I thought I might share a few things that I do to keep my energy costs down.
1. I keep the heat set at 62 F. Any colder and even wearing layers doesn't seem like enough sometimes. (Makes hot showers feel extra nice though). I have found that it is a good temperature for sleeping.
2. I don't keep the water heater at it's highest setting. When it is at the highest setting the water coming out of the tap can easily scald me. For safety as well as for the energy savings I keep it at a setting that lets me have enough hot water for a shower, without the possibility of cooking myself.
3. I have a plastic insulating layer over all my windows. I have found that this cuts drafts down enormously and the heater kicks on much less frequently. I also have runners along my doors to keep draft down from that area as well.
4. I close off rooms that I am not using. By close off I mean I close the heating vents in these rooms and keep the door closed to prevent any additional heat loss in these areas. I basically only heat the main living area, the bedroom and the bathroom. No sense in spending money to heat rooms that don't need it.
5. I don't have a clothes dryer. I have found that I can easily dry all of my clothing on one or two drying racks. Since I only have to worry about my own laundry this works out well since I only wash one or two loads a week. It only takes a day to dry most things, though some heavier items like jeans can take two days to dry.
6. I don't have a TV. Here I can save money both by not having a cable bill, but also by not having to use electricity to keep one running for hours on end.
7. I do my best to turn off any lights in rooms that I am not using. It seems like common sense, but it still keeps energy costs low. I also use ambient lighting when at all possible. I think that lighting a few candles can help heat a small room as well as provide some light.
8. I try to do as much as I can outside when there is daylight. Not only does this keep me from using lights and other energy consuming devices indoors, but it keeps me in shape too (I don't generally sit around when I am outside!)
9. I only use cold water to wash laundry. I find that my clothes get just as clean with cold water as they do with hot, and I have less trouble with colors bleeding and fading when I only use cold water. By not heating the water for loads of laundry I also save a bit of propane in the long run.
This list is only a drop in the bucket of all the things one can do to reduce energy consumption. Feel free to add your own suggestions!
1. I keep the heat set at 62 F. Any colder and even wearing layers doesn't seem like enough sometimes. (Makes hot showers feel extra nice though). I have found that it is a good temperature for sleeping.
2. I don't keep the water heater at it's highest setting. When it is at the highest setting the water coming out of the tap can easily scald me. For safety as well as for the energy savings I keep it at a setting that lets me have enough hot water for a shower, without the possibility of cooking myself.
3. I have a plastic insulating layer over all my windows. I have found that this cuts drafts down enormously and the heater kicks on much less frequently. I also have runners along my doors to keep draft down from that area as well.
4. I close off rooms that I am not using. By close off I mean I close the heating vents in these rooms and keep the door closed to prevent any additional heat loss in these areas. I basically only heat the main living area, the bedroom and the bathroom. No sense in spending money to heat rooms that don't need it.
5. I don't have a clothes dryer. I have found that I can easily dry all of my clothing on one or two drying racks. Since I only have to worry about my own laundry this works out well since I only wash one or two loads a week. It only takes a day to dry most things, though some heavier items like jeans can take two days to dry.
6. I don't have a TV. Here I can save money both by not having a cable bill, but also by not having to use electricity to keep one running for hours on end.
7. I do my best to turn off any lights in rooms that I am not using. It seems like common sense, but it still keeps energy costs low. I also use ambient lighting when at all possible. I think that lighting a few candles can help heat a small room as well as provide some light.
8. I try to do as much as I can outside when there is daylight. Not only does this keep me from using lights and other energy consuming devices indoors, but it keeps me in shape too (I don't generally sit around when I am outside!)
9. I only use cold water to wash laundry. I find that my clothes get just as clean with cold water as they do with hot, and I have less trouble with colors bleeding and fading when I only use cold water. By not heating the water for loads of laundry I also save a bit of propane in the long run.
This list is only a drop in the bucket of all the things one can do to reduce energy consumption. Feel free to add your own suggestions!
Tuesday, November 17, 2015
Hiking Adventure: Eagle Valley Trail
There are very few places to get a good hike in November where I moved from. However, here there are plenty of good places to take a hike. There has already been snow at higher elevations, but here in the valley the trails are nice and clear. This area is BLM land which means it is owned by the Bureau of Land Management. It's high desert and at this time of year, the temperatures are just about perfect for the exertion of hiking here.


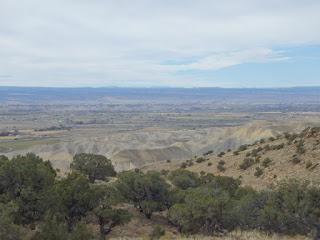


This area is part of the Gunnison Gorge and is the other side of the Black Canyon. The layers of rock here are thrust up at steep angles.

The trail starts by following a slot canyon up for several hundred feet. The trail twists and turns through the canyon. Some areas are slickwashed rock.....not a place I'd want to be caught in during a downpour.


This area is full of sandstone that has been carved by millenia of wind and water. Many hollows can be found all over the cliff faces,


At the top of the ridge the trail divides, north becomes the Sidewinder trail and south becomes the Sunset Rocks trail. I followed the Sunset Rocks trail south for quite a ways. The view to the west was a beautiful panorama.
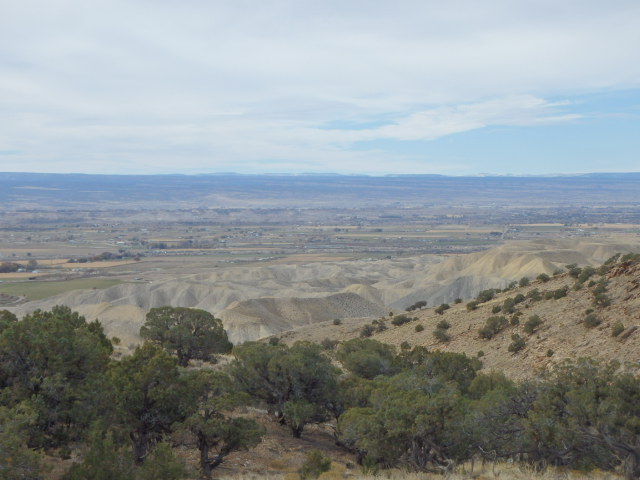
When I reached my lunchbreak point I had a fabulous view of the the valley and the plateau to the west, the San Juan Mountains to the south, and the Grand Mesa to the north. Not bad for a mid-November afternoon.

Subscribe to:
Posts (Atom)