Friday, December 30, 2016

Spinning up a Blank Palate

Things have slowed way down in the garden and the weather has turned cold and blustery outside, so I have had more time to devote to fiber crafts lately.  After I finished the few orders that I had for Christmas gifts, I turned my attentions to spinning up more yarn from my collection of fiber.  I had about a pound of a bamboo/merino roving that I have been wanting to work on, so I got it out and spun it up.
This is the raw fiber processed into an organized ball of roving.  This is the easiest way to work with fiber, though some people like the pre-processing steps, I think they are time consuming so I prefer to skip the processing steps and get straight to spinning.  

This is the roving spun into a single strand of yarn, better known as a single ply.  I combine two single strands by plying them together, or by spinning them together with the opposite twist of how they were spun as singles.  The twisting of the fibers helps them hold together and then this forms a yarn, in this case a two ply yarn.  If I added more plies it would increase the thickness of the yarn.


After getting a spool filled with the yarn, I transfer the yarn to my home made niddy noddy. 
 This allows me to measure my yarn's length and keep it organized when I wrap it into a skein.
This particular spool of yarn came out to about 205 yards or 616 feet.

This skein of yarn is now ready for anything that I want to do with it.  It is a blank slate for dying it any color that I want, or crocheting or knitting it into any shape that I can imagine.  The possibilities are limitless.

Tuesday, December 27, 2016

Winter's Grand Entrance

The weather has been mild the past few days and there has been only dustings of snow over the past few weeks.  Last night all of that changed.  It has been very windy, but warm all day yesterday.  Clouds came rolling in over the plateau to the west and rain came and went all afternoon.  Even as the sun sank, the temps hovered in the 40's.  Sometime just after midnight, the rain went from blustery sprinkles to a full on downpour and the winds howled from the west, driving sheets of rain sideways across the countryside.  Then the temperature dropped and the sheets of rain became thick swirls of heavy wet snowflakes that stuck to everything they touched.  My doors are covered in a crust of ice and outside the world is coated with a layer of heavy, icy snow.  This morning the snow has stopped, though the wind is still busy scouring the countryside.  We didn't end up with a ton of snow in this semi arid area, but the change in scenery is beautiful.  I love nothing more that waking up after a snow storm and just enjoying the untouched beauty of freshly fallen snow.


The garden is most definitely down for the season and the chickens are all tucked in under their hoop house.  I might let them out later to explore the snow if they want, but I think they are appreciating the protection from the elements today.  They are still happily laying plenty of eggs for me and seem quite content, though maybe a little bored.  I will have to throw them some scratch next time I go out to give them something to do.

The hoop house that I have my overwintering lettuce and spinach in didn't fare the storm too badly. I think I will still be able to salvage it in the spring when the world thaws out again.
 The pea trellis didn't stand up to the storm well, but it wasn't really meant to be used into this kind of weather.  It was a makeshift trellis anyway, but I hope to reuse it in the spring after I reinforce it better.
This year's first real snowstorm has made it's grand appearance and things are finally starting to feel like winter around here.  I suppose it is appropriate weather for the winter solstice.  I will enjoy the snow while it lasts since I know that it never stays long down in this little valley. 

Saturday, December 24, 2016

Fresh Salad in December!

There are very few things more satisfying than harvesting fresh salad fixings from the backyard in December.  In fact, I am amazed that I can harvest anything at all since it has been so chilly here over the past few weeks.  Today was a little over freezing so I decided that it would be a good time to peek inside the low hoop tunnel where I have a bed of lettuce and spinach planted.  I was pleasantly surprised to find some very happy looking spinach plants under the plastic.  The lettuce didn't fare as well, but at least I still had something to show for my effort.

In a nearby bed I also had another secret harvest hidden.  When I planted my brussel sprouts this spring I planted a row of carrots on each side of them.  All summer the carrots grew under the canopy of brussel sprouts, but now the plants had wilted back, revealing the carrot tops beneath.  I took my shovel and carefully lifted a few from the ground.  They weren't very large, but they sure were sweet!
 I washed them up and then sliced them into a bed of torn spinach.  While I was preparing the salad, I set some fresh eggs on to boil and picked through what was left of the last tomato harvest.  The pickings were slim, but I managed to find a small handful of still edible tomatoes that I washed and sliced and added to the salad .  When it was all said and done I had a delicious winter lunch all picked straight out of my backyard.  You would be hard pressed to find food fresher than this anywhere else.

Now that was a satisfying lunch!

Sunday, December 18, 2016

Baby and Toddler Hats

Today I finished working on a couple more presents for Christmas.  I have the weekend to myself, so I am doing my best to tie up all my loose ends before the holiday gets here.  Today this meant spending a few hours crocheting mini hats for kids.
This one is for a little girl that lives in one of the coldest towns in the state.  I hope it keeps her nice and warm this winter.

This one is for a baby boy who is celebrating his first Christmas this year.  He is only a few months old, so I made the hat pretty small.  I haven't made very many tiny hats, so it was hard to guess just how big I should make it, but I like the way it turned out.  I hope that even if it doesn't fit that it is just a little big, so he can grow into it in the next few months.


Eagle Valley Views

There is a nice little hike not too far from my house where I tend to go in the winter since it is easily accessible in most weather.  We had a little dusting of snow a few days ago and I decided to hike up to see the view.  The hike itself winds through a little slot canyon with slick rock sections alternating with loose rocks as the trail climbs in elevation.  It is a well worn trail and the footing can be tricky in places, but I just take my time and pay attention to where I put my feet.  Eagle Valley trail meets with Sunset trail at a T- intersection.  Sunset trail winds over the hills to the south and the views of the valley from up here are breathtaking.


Thursday, December 15, 2016

Dry Creek Hike

Now that the weather has begun to act like winter, my hikes are now limited to just the local areas in the valley where it is warmer and drier than the high peaks to the south and the mesa to the north.  In my opinion this really is the best time of the year to hike in these valleys because there is no snow to contend with and the weather is generally sunny, but cool.  These local hikes would be torture in the summer, just because of how hot it can be, but they are still pretty places to go explore.

A friend of mine told me about this hike, with the highlight being some petroglyphs on a large boulder not too far into the hike.  For the most part the hike is pretty easy winding down a small valley that follows a seasonal creek.  There are short sections of oak forest that are nice to walk through in their dappled shade.  I went early in the day after a good cold night and was able to catch the frost in the forest before it evaporated away.


The sides of the valley rose steeply on either side and many birds made thier homes on the side of this cliff.

There were a number of interesting rocks that had been carved by wind and time along the path that I was hiking.  Some looked like they had been chewed up from the inside out, proving that not even rocks can stand up to the strength of the high deset wind.

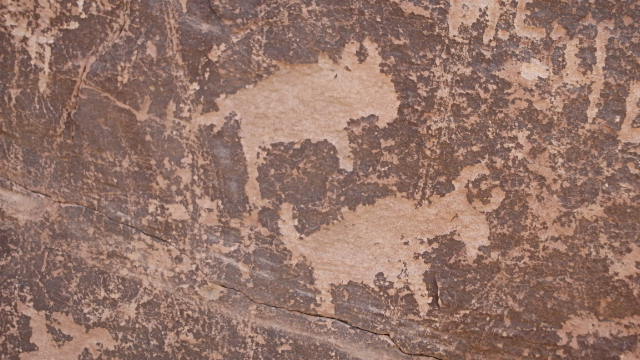
The boulder with the petroglyphs was probably very impressive at one point, but I was dissapointed to find it nearly ruined by modern graffitti and bullet holes.  There were still a few original native pictures carved into the stone thankfully, but I wonder how long it will be before they too are lost to the winds of time.


After the petroglyphs, I followed the trail farther down the valley.  Gradually the trail began to rise in elevation and the valley seemed to come to a point at a low peak. 

At this point I had already been hiking for a good hour and a half, so here I decided to take a break and have a snack on the trail.  The silence was perfect and only broken occasionally by the sound of flocks of small birds twittering down the valley, or the hawk lazily circling overhead.


When I turned to head back, the Cimmarons were just coming into view across the way to the east.  I find it amazing that such great views are so easy to come by in this area of the country.  It seems that no matter which way I turn, there are views as far as the eye can see.  Perhaps I pay more attention to them since I came from an area that had nothing but flatness and houses for as far as the eye could see.  It sure makes me happy that I get to live here.

Monday, December 12, 2016

Cabbage Harvest

The temperatures around here have been dipping into the teens at night and my standing bed of cabbage was beginning to look a little sad.  They had formed nice heads, but I was waiting to harvest so I could make a little more room in the freezer.  I had to change my plans though because this is the time of year that I will allow the chickens free range in the garden to help fertilize and stir up the soil in the beds.  Things had been fine until yesterday.  They decided that they really love red cabbage and pecked off half of the heads before I realized what they were up to.


I decided that the red cabbages were too far gone to be worth saving, but they hadn't made a move on the green cabbages yet, so I got to work harvesting.  There were only three to harvest, but I had to use a hatchet to chop through their thick, frozen stems.  I trimmed off the loose leaves and left them in the bed to become mulch.  The heads I brought inside to thaw so I could process them properly.

One of the heads was huge and weighed in at 4lbs 5.4oz.  The other two heads were about average sized and weighed in at 2lbs 5 oz and 1lb 14oz respectively.  I will wash them thoroughly and then blanch and freeze them for future use. I am looking forward to using my home grown cabbage on St. Patricks Day next year! 

Friday, December 9, 2016

Tucking in Garden Beds for Winter

It is now December and most of the garden beds are in a state of dormancy.  I still have brussel sprouts and cabbages out in a couple of the beds, but I will need to harvest those before too long.  I am just waiting to see how much room I have left in the freezer after I get the half a pig I have been working all summer for.  In the mean time they can hang out in the garden as they don't seem to mind the cold weather at all.  I also have a bed of lettuce and spinach that are covered by a low hoop tunnel that also seem quite happy despite the freezing nights here.

The other beds are all in different stages of getting ready for spring.  Since the temps have still been decent during the day, I have been working on preparing the beds for next spring as best I can.  Preparing the beds usually involves removing the crop residue from the previous crops and then spading the beds to remove as many weeds as possible.  I made the mistake of mulching with hay this spring, and most of my beds have some very vigorus clover and plantains taking them over.  I hope that by digging them all out, I can get a head start on next years weed control.  The next step after turning the beds over is to add organic matter to the beds.  Right now I don't have any access to horse manure like I did in the spring, but I have plenty of full bags of leaves to mulch into my garden beds.  I spread a thick layer of leaves over each spaded bed, then use a hoe to thoroughly mix the soil and the leaves in the bed.  The leaves will decompose over the winter and help to fluff up the soil for spring crops.  Once the leaves are mixed in well, I level the bed and then cover it again with another thick layer of leaves.  This cover layer will help hold any moisture in the soil and protect the surface soils from blowing away in the windy, dry winter here.


I still have at least four main beds left to turn over and mulch, but if they have to wait until spring it isn't a big deal.  The three beds should be enough for me to start my early spring crops in, so I am happy that most of the prep work is finished.  Planting days will hopefully be as simple as pulling back the mulch and tucking in some seeds.  Until then, these beds will simply spend the winter digesting their fallen leaves and making more soil.

Tuesday, December 6, 2016

A Few More Hats for My Collection

With not much to do outside and the weather getting colder, I have been spending my days off busily crocheting.  This set of hats may become gifts for friends, or just be added to my sales collection that I am accumulating for a craft fair.  These are made from regular store bought yarns, but the mixture of colors came out well, and they are soft and warm.


I really like making the hats with the ear warmers because I really think they make a difference, especially on cold and windy days.  The braids do double duty as a decoration and are useful for snugging the ear warmers down over ears if you tie them under your chin.  Keeps the wind out great!

Saturday, December 3, 2016

Bottling the Sweet Plum Wine

It has been over a month since I racked the plum wine.  I finally had a chance to clean all the bottles that I had saved so I would be ready to bottle this batch of wine.  The first step was to sterilize them all with boiling water.  I simple heat up water in my tea kettle and pour it into each bottle and let it sit for a couple minutes before emptying.  I set them up to dry on a clean towel and then prepared my set up for bottling.  One by one I filled the bottles using a siphon hose to transfer the wine from the large glass carboy to the bottles.  Once I was done, I used a turkey baster to even out the amounts of wine in the top of each bottle - leaving room for a cork.  Then one by one I used my cork press to cork each bottle.  I filled a total of 22 bottles plus a half gallon growler bottle with this beautiful and delicious sweet plum wine.

  
I think that this amount of wine is a pretty good return on a box of plums, a packet of yeast, and a couple of bags of sugar.  I think the total cost came in around $45 which translates to just a little over $2 a bottle.  Not a bad price for a tasty and colorful homemade bottle of wine.  

Wednesday, November 30, 2016

Winterizing the Chicken Coop

Having an unconventional coop means coming up with unconventional solutions to taking care of my flock of chickens in cold weather.  I was hoping to make it more like a greenhouse for the winter, but my budget wouldn't allow me to purchase the plastic that I wanted to cover the coop with.  Instead I used a variety of tarps to do the job for now.  Chickens need a dry, draft free place in order to be warm enough, so I covered as much surface area as possible with tarps.  I know the tarps will only last me a season or two, so I am not as worried about them being damaged by the wind and the weather out here.  I used my largest tarp to cover the back of the laying house and the rear of the pen.


The chickens all roost on the boards in the pen at night, so I am trying to make it as comfortable as possible for them.  The top of the pen was already covered by a small sheet of visqueen plastic and a tarp to keep off the rain, so all I had to do was get a tarp to cover each side to the bottom.  I had left the front of the enclosure open, but now that I had a sheet of plastic from the greenhouse that I took down I was able to cover the pen more completely.

 I pinned one side of the sheet over the rooster pen and the far side of the hen pen.  I draped the rest of the sheet over and pinned the top over the door.  There is still a small gap at the top by the door, but I think allowing for some ventilation at the top allows any moisture trapped under the plastic to find it's way out.  The side that covers the door is weighted down with a few large rocks and I can move it back to allow them to have more fresh air during the day.  At night I pull the plastic sheeting across the open front and hold it in place with more rocks.


So far the set up seems to be working.  During the day it has been a very comfortable temperature inside the pen even when it's a bit chillier outside.  At night I think it traps enough of the chicken's body heat to keep it a few degrees warmer inside than out.  I am glad that I chose cold hardy breeds for my flock as they seem quite content in this set up and haven't acted the least disturbed by the change in the weather lately.

I don't plan on giving them any extra lighting and so far thier egg production seems unfazed by the shorter days we are having.  Hopefully they will keep it up through winter and next spring will hopefully be a good time to hatch out more chicks and grow my flock a little larger.


The roosters in the bachelor pad are benefiting from the extra protection as well.  While they don't have the most ideal set up, they are totally protected from the elements and get to share a bit a the warmth from the larger run that theirs is attatched to.  In the next few months I will be deciding which roosters make the cut for a breeding program and hope to reduce the number of roosters down to two that will be living with the hens full time.  By spring I am hoping to use this pen to brood my next batch of chicks.

Sunday, November 27, 2016

Winding Down the Garden

Winter finally decided to show up last week and we had a nice little blustery cold front come through that brought temps in the low 20s to my garden.  I think that it is safe to say that only the very hardiest of the plants survived, though the next few days will probably reveal the extent of the damage.  I don't think the peas will produce anything this season, so they will go to feed the garden soil and the chickens who think the stems and leaves are delectable.

The brussel sprouts look pretty tired, but I think I might have some harvestable sprouts under the cover of leaves.

The cabbages have taken some damage as well, but I think that I will have four or five nice heads out of this bed.  Not bad considering that I already got a harvest of onions out of this same bed earlier this year.

The rest of the garden is pretty much done for and I am gradually trying to prepare each bed for winter.  This also means that it was time to take down the greenhouse that I had over the peppers and tomatoes.  It did a fair job keeping the tomatoes going and I just harvested the last of them this week, the night before the hard freezes.

 I will save the pvc pipes and the plastic for hoop houses this spring.  I know that there are a few more parsnips hiding in some of these beds, so I will have to dig them out as I go along. I also dismantled the cucumber trellis so I can mulch in this bed for winter.  There is still a fair amount of work to be done this season and I am trying to make good use of the weekends with nice weather to get it done.  I don't know how long the warm spells will last, but I am taking the hint that winter is well on its way, and it's gonna get chilly.  I hope I can get it all done before the snow hits down in this valley.


Thursday, November 24, 2016

Using every last bit: Ham bone stock

Something that I try to be mindful of in my day to day life is using every last bit of everything that I can.  Today I made use of the ham bone left over from a ham that I baked last week.  I trimmed all the extra meat that I could and then put the bone in a large stock pot and covered it with water.  To the water I added fresh celery stalks, carrots, onions, garlic and a couple of bay leaves.  I brought it all to a boil then reduced it to a simmer and let it cook for hours on the back burner.  The aroma that filled my house today was amazing!

At the end of the day I turned off the heat and let everything cool for a few hours.  Before I went to bed, I put the stock in the fridge to cool even more overight.  The next day, I strained the chilled stock into a bowl then returned it to the now clean stock pot to be simmered for a few more hours to concentrate it a little bit more.  After it cooled down again, I transfered the stock into freezer bags for long term storage.  I had a total of 12 cups of stock when it was all said and done.

The scraps left over from the stock, including the ham bone went to the chickens.  They happily gobbled up every last bit and picked the bone clean.  I think they were some very happy chickens today!  They left me seven eggs instead of the usual three or four!


Monday, November 21, 2016

Another Christmas Hat Delivered

I have happily been able to finish another hat for a friend that wanted to give one to her daughter as a gift.  She requested the softest yarn that I could find and asked that I made it blue and white to match her daughter's winter jacket.

I think this one turned out great!  I like how mixing the colors makes a unique pattern when I crochet them together.  I hope that it fits well! Those ear flaps should keep her nice and warm this winter and I hope that she gets plenty of chances to wear it!

Friday, November 18, 2016

Planting Garlic

The fall season is well underway, and though most of the garden is winding down, I still have one crop left to plant this year: Garlic!  We have had a few frosts though the weather has been warm this week, so I thought the time was perfect for getting another crop of garlic into the ground.

The first step in the process was preparing the bed for another crop.  This bed has been busy this year and has grown a crop of peas this spring, and a crop of turnips and beets in late summer.  Now that those crops are out of the bed I needed to amend the soil a bit before I planted my garlic.  I didn't have much in the way of compost that I could add, but I did sprinkle a layer of ashes from my fire pit (from burning loads of ragweed) and a layer of composting grass clippings that I had.  I am hoping the grass clippings break down a bit over the winter and add some organic matter to this soil which is largely hard clay and river rocks.
This is the bed after I pulled the beets.  I did my best to break up the large clumps of soil and removed any large rocks that I came across.  After turning the soil over, the bed was ready for planting.

I raked out any left over weeds and large clumps of soil, then raked it as smooth as I could.  I added a third drip line to the bed and then started laying out the garlic cloves in a grid across the bed.  I think I was able to get a clove every six inches or so and ended up planting 105 cloves total of three different varieties.  I don't know what the varieties are called, but there is a red soft neck, a red hard neck and a white hard neck.  The red hard neck is a new variety this year that I got at the local farmer's market to round out my bed.  


After all the cloves were properly planted I turned on the water to make sure that the drip irrigation was working well for this bed.  I am glad that I checked because two of the lines for this bed barely dripped at all, so I fixed them by poking new holes every few inches with a thumb tack.  Now I know that this bed will be well watered.

The last step was to mulch the bed.  Again I used a bunch of composting grass clippings to cover the bed because that is what I had on hand.  The grass clippings will keep the moisture in the bed and protect the newly planted garlic from extreme temperatures.

In the spring I will help the garlic shoots poke through the thick mulch, but will leave it on the bed so that it helps to reduce the number of weeds that want to grow in this bed.  I hope that next summer's garlic crop is big and healthy.  I am trying to give it the best head start that I can.


Monday, November 14, 2016

Crocheted Christmas Gifts

This is a good time of year for me to work on my crochet projects.  The sun is setting earlier and I can't do much work outside in the dark, so I have been spending my spare time crocheting hats.  A friend of mine at work ordered a couple of hats for Chistmas gifts for her kids.  She told me which colors she wanted in the hats and I went and found the right color yarn from the local craft store and got to work.


I am really happy with how they turned out.  They will be nice and warm since they are so thick, and the colors work well together.  I think they will make the perfect Christmas present for a couple of girls that love to ski.

Friday, November 11, 2016

Digging Up the Parsnips

Parsnips were one of those crops that I tucked in here and there in some of the garden beds.  When I planted the squash bed I added a handful of parsnips seeds in the empty spaces between the hills.  I figured they would have enough time to grow under the cover of the squash crop without interfering since they have a low growth habit and deep tap roots.  I wanted to plant parsnips mostly because of their long tap root.  My soil is heavy clay and I was hoping that the roots would help break up the soil a little bit.  They are a useful crop and they will make a nice addition to winter soups and stews.  I didn't plant a lot of them, but they are scattered throughout the garden, so I hope to get a decent amount by the time I have dug them all.

  This handful of parsnips is just a part of the total harvest I hope to get this year.  I should still have a couple hiding amongst the peppers and possibly a few in the broccoli bed as well.

Tuesday, November 8, 2016

Canning Tomato Sauce

The tomato harvest this year has been slow in coming, but as it has trickled in I have been putting the ripest of them into the freezer, filling multiple gallon bags along the way.  I didn't have enough time to can any of them this summer because I was plenty busy preserving other produce from the garden.  The other reason I have been freezing them, aside from keeping them as fresh as possible, is to make them easier to skin for the sauce.  I have tried boiling them to skin them in the past, but it is so much simpler just to peel the skins off as they thaw.  Much nicer than burning my fingers trying to peel hot tomatoes.


So I began with four gallon bags of whole tomatoes.  I use all of my varieties of tomatoes for sauce including the cherry tomatoes since I have far too many to eat them all fresh and they all add thier own delicious flavor to the sauce.  I washed the frozen tomatoes and then removed any stems and trimmed off any bad spots.  All of the tomatoes went into my biggest pot and then I added a little water to start the cooking process.  As they warmed, I pulled them out one by one and peeled their skins off, then returned them to the pot.  Eventually they started to simmer and I let them cook down for a few hours before moving on to the next step.


After all the tomatoes had become mostly liquid they took a turn going through my food mill.  I didn't want all the seeds in my sauce and this is how I removed as many as I could as well as any skins or tough parts that I may have missed.  The seeds and skins that were left all went to the chickens who happily ate every last crumb.  The sauce was returned to the pot where I let it simmer most of the day to become thicker.  I like a fairly thick sauce, but I didn't want to make paste, so I cooked it down until it was reduced by half and stuck to the spoon a bit as I poured it off.


When the sauce was getting closed to the desired consistancy I started to prepare the jars and canner for the final stage.  I made sure that they were boiled for at least ten minutes before I started to transfer the sauce to the jars.  Each jar got a tablespoon of lemon juice and then was filled with sauce.  I left a half inch of head space in each jar, then wiped the rims and secured the lids and returned them to the boiling water.  I let them boil for forty-five minutes, then rest for five, then the jars went onto the counter to seal and cool for several hours.  After all that work, the four gallons of fresh frozen tomatoes cooked down to only eight pints of sauce.  I added them to the other six pints I made a few weeks ago.  It isn't a ton of sauce but I should have enough for a few tomato based dishes over the winter.