Monday, February 29, 2016

Spring Has Sprung

This year the groundhog didn't see his shadow due to a decent snowstorm that blew through that day.  His prediction of an early spring seems to be coming true.  The days have been getting well into the 50's here for the past two to three weeks and the overnight temps have been creeping closer and closer to the freezing mark.  It certainly felt a lot like spring, and the local flora and fauna seemed to agree.

And today I noticed this out in the garden:
It's the garlic that I planted late last fall.  

The garlic coming up is a sure sign of spring.  Like daffodils and tulips, overwintered bulbs will be the first to show up at the beginning of the season.  Even though the calender says that spring is still three weeks away, my garden is telling me that it is already here, and that makes me a happy gardener!

Saturday, February 27, 2016

The Chicks Have Arrived

I am happy to announce that my new chicks have arrived.  I have spent the last couple days gathering the needed supplies for the arrival of the new chicks.  I had to buy a new bulb for my heat lamp since the last one didn't survive the move across the country.  I also bought a fresh supply of chick feed from the local co-op.  I already had the bases of the chick feeder and waterer and all I had to do was dig out a couple of quart mason jars to complete them.  I made sure that I had their brooder box all set up before I brought them home.  In the bottom is a layer of newspaper to make cleaning it out a little easier.  The newspaper is covered with a generous layer of wood shavings for bedding.  I hung the heat lamp about eighteen inches above the brooder to get the correct temperature for the new chicks.

I am starting small in my newest chicken adventure and decided to only get six chickens.  I did want to have a variety so I choose three different kinds and got two of each variety.  The types I chose were Rhode Island Reds, Buff Orpingtons, and Barred Rocks.  All of these breeds are considered dual purpose which means that they lay a lot of eggs, but also have a meatier frame than exclusive egg layers which makes them good for eating too.  All of these breeds are fairly cold hardy.  The winter temps in this area can get quite cold at night, so I wanted to make sure that I chose birds that would be able to tolerate that well.  In following the cold tolerant logic, I also chose breeds that have smaller combs so they are less likely to get frost bite in the winter.

Right now I have the new chicks set up in a back bedroom - mostly to keep them safe from the cats and dog.  Here they will spend the next few weeks, eating, pooping and sleeping until they have enough feathers to be able to handle outdoor temperatures.  Their brooder box is simply a large rubbermaid bin, which is fine for now, but they will probably outgrow it in a matter of weeks.  Chickens grow amazingly fast!  When they get too big to stay in their brooder, I will move them and their heat lamp to the big coop outside where they will begin their lives as my new flock of laying chickens.


Thursday, February 25, 2016

Bottling Up the Apple Cider Wine

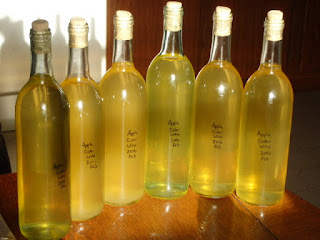
I started fermenting a batch of apple cider wine about two months ago as I outlined in this post.  In the past couple weeks, the wine has cleared completely and left a thick layer of yeasty sediment at the bottom of the bottles.  This is how I knew that the wine was finished fermenting.  I was afraid that I left it in the primary fermenter for too long because they only seemed to bubble for a couple days after they were transferred to the glass carboys and fitted with airlocks.  When I did the sniff test to see if it was wine and not vinegar, I was happy to smell something that definitely smelled like wine.

I carefully carried the carboys to my kitchen and tried to disturb the sediment at little as possible.  Then I put a pot of water on to boil so I could sterilize the bottles that I was going to put the wine into.  Some instructions recommend using a chemical sterilizing agent before bottling wine, but I have found that rinsing the bottles with boiling water seems to work just fine.

After the bottles had been rinsed with the boiling water and allowed to dry briefly, I used a siphon to transfer the wine from the carboys into the bottles, doing my best to keep the sediment from being sucked into the bottles.  When it was all said and done, I had six and a half bottles of apple cider wine to show for my efforts.  Not bad for $20!
You may notice that a couple of these bottles look a bit cloudy.  I'm guessing I wasn't as good at keeping the sediment out as I wanted to be, so these bottles will probably be used first.  It is probably why most recipes call for racking the wine a time or two before bottling.  I was afraid to rack this wine because I thought they might get too much exposure to air and become vinegar instead, so I opted to just bottle it.  Next time I will shorten the time I leave it in the primary fermentation stage and make sure that I rack it at least once before bottling.  After it has aged for a few months I will get my first taste of the first batch of apple cider wine I have ever made.  I can hardly wait!

Monday, February 22, 2016

Finishing the Chicken Coop

This weekend had beautiful weather and I was able to put most of the finishing touches on the chicken coop.  I wanted to make this coop mobile so I had been on the lookout for some cheap wheels.  I had looked at wheels for garden carts and wheelbarrows, but many of them cost upwards of $15 or more per wheel and I wasn't looking to spend a lot for wheels for this project, so I started looking around at the local resale shops.  I considered bike wheels, but wasn't sure if I wanted wheels that large on the coop.  I also wanted something that would be fairly simple to attach, and not hold the coop very high off the ground.  Finally I came across a handful of jogging strollers.  The wheels were almost exactly what I was looking for.  The only concern I had was whether or not they would support the weight of the coop.  I checked the prices and the cheapest one was $15.  I could have three wheels for the price of one, so I promptly bought it and brought it home.

I was happily surprised to find out the the wheels were already mounted on a pin, so I wouldn't have to buy any additional hardware to attach them to the coop.  All that needed to be done was to drill a hole through the sides of the base and pound the wheels into place.  Very simple and already functional.

I will probably secure the wheels better on the inside with a pin, but they fit so snugly in the holes, that I can easily move the coop without the wheels coming loose.


The next step that was completed was attaching the access door.  Originally I had wanted to have a main access door on one side to make it easy to clean the coop, and a small access door for the chickens on a different side.  However, this would have make attaching the run to the coop difficult, so I decided to put the chicken door on the main access door.  First I attached the last piece of sheet metal to the top of the coop with a pair of door hinges.  The door opens upwards and will simply be held open with a board when I need to clean out the coop.  The smaller door came from the same salvage wood as the end of the chicken run.  The cabinet door is the perfect size for a chicken , and after I put it in place, I simply cut a hole in the sheet metal behind it.


The edge of the coop sits nicely on the lip of the chicken run and the floor lays nearly level when they are attached to each other.  I will thread a rope from the chicken door through the top of the run to make it easy to open and close the door without having to enter the run.  

In a few more days, I will be getting a small batch of baby chicks which will start their life in a rubbermaid bin in my back room.  In about a month, or whenever they are feathered out enough and the weather is nice enough, they will be moved to their custom built chicken tractor.  I only have a few more weeks to put the finishing touches on the chicken tractor, but I'm sure everything will be ready when they are!  Nothing will get me motivated more than taking that next step to growing more of my own food!


Saturday, February 20, 2016

The Onions Have Sprouted

I planted my first round of onion seeds only a couple of weeks ago, and already I am seeing tiny sprouts.  The yellow onions were the first to appear, followed about a week later by the red.  I only planted about 30 of each type to start, and plan on starting a second round in a few days.  If these seedlings aren't enough to fill the bed that I plan on putting them in, I will probably buy some onion sets from the co-op this spring.  I like having a variety of each type of crop just in case one doesn't work out well.  It never hurts to have a back up plan.  Hopefully, these seedlings will grow big and strong so they have a better chance for lasting longer after I harvest them.

The yellow onions are a variety called Juane Paille Des Vertus.  I ordered them from Baker Creek Heirloom Seeds online.  Their good keeping qualities are what I am looking for in the onions that I grow.  I also wanted these because they are a very old variety that have been grown in Europe since the late 1700's, and they are becoming rare.  I hope they do well in my semi-arid climate.  If they do, I will try to save some seeds from them if I can.

The red onions are a variety called Southport Red Globe.  These also came from Baker Creek Heirloom Seeds, but they aren't as old a variety as the Juane Paille Des Vertus.  Still, they had excellent reviews, and one of the most commonly mentioned attributes was their good keeping quality and flavor.  I have never had much luck with red onions keeping for very long, but I hope this variety stands up to it's reputation.

Monday, February 15, 2016

Chicken Run Construction

Today I learned that I would be able to get chicks as early as next week which makes me very happy that I had already started working on the next stage of my chicken tractor - the run.  The coop isn't entirely finished yet, but I don't think that it will take too long to attach the main access door and cut a small door in the side for the chickens to get to their run.  The idea is still to keep the coop and the run separate to make it easier to move them.  Since the coop has a solid floor, I will probably do most of the moving after the birds have gone to roost for the night.  The coop will be getting a set of wheels to assist in the ease of transport since it is the heavier of the two structures.  The run will just sit on the ground and will hopefully be light enough to pick up and carry.

The run is going to double as a hoop house so I designed it to be the same size as my garden beds.  While I don't think I am going to use them in the garden this summer, they can certainly assist me in the fall clean up of the beds when that time comes.  The bottom frame was built from three 10 ft 2x4's, one for each long side and one cut to fit the shorter ends of the structure.  The main supports are simply 1/2 inch pvc pipe cut to about seven feet long and held in place by pipe straps secured to the bottom frame.  I also used one full length of pipe for the back bone of the hoop run.  I secured it to the hoops by drilling a hole through each end and attaching it the hoops with wire.  


To the frame I attached 1 inch chicken wire fencing, securing it with galvanized wire to the pvc frame.  For now I am allowing the extra chicken wire to flare out at the bottom of the run to deter digging predators and may even pin this to the ground for additional protection.  In the future I may run a solar powered electric wire around the enclosure for protection if needed. I have also left a flare on the end to make closing off the end of the run easier.

One end of the run was filled in with some salvage lumber from a bathroom remodel next door.  Some cabinet doors and a painted piece of plywood were cut to fit the arch of the run and secured to the base frame with some screws.  There is a small access door in the top of the run, so I can change out food and water dishes from this side.


Two smaller pieces were used to close the gaps between the access door and the fenced sides of the run. The door does stand out above the top of the run when it is closed, but that will make it easy to secure with a wire latch.

The last step for completing the hoop run is to staple the chicken wire securely to the base frame.
I might also attach some handles and some wheels in the future to make it easier to move, but for right now I think it will be plenty functional.  The open end will be attached to the coop, and I will probably cover one end of the run with a tarp to provide shade and some extra protection from the elements.

Overall this little project cost me less then $50.  The lumber was about $12, The pvc pipe, wire and fasteners were about $12, and the chicken wire was $25 for a 25 ft roll.  Considering that the coop was free aside from a box of screws, I am pretty happy with the cost of this little endeavor.  If it proves to be a predator proof enclosure, It would be simple enough to build a few more to increase the size of my flock in the future.

Thursday, February 11, 2016

The First Seedlings Have Sprouted

I am so excited that the seeds I planted nearly three weeks ago are finally coming up.  They are simple, tiny little celery plants, but for me they are the first sign of spring.  I plant them this early precisely because they take so long to get going.  Even though they started coming up just a couple days ago, they will still take another eight to twelve weeks to become big enough to transplant.


The next seedlings I expect will be up in a few days are the onions.  It has only been one week since they were planted, and they can be a little slow to get started as well.  I hope to do a succession planting of those in about three weeks.  Onions are nice because they can go out under a hoop house early and they don't mind the cold as much as some other plants.

The next crop that I am going to start will be my lettuces, followed by the brassicas and peppers.  There may not be very many seedlings at the moment, but in the next few weeks I will be having trouble finding places to put them all.