Sunday, April 30, 2017

Canyon of the Ancients

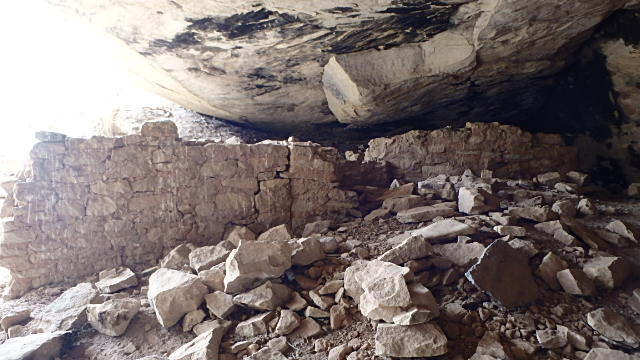
Last weekend I had the opportunity to go for an impromptu camping trip.  It is a little early in the season, but the weather has been having warm spells lately, so I thought that I would brave one chilly night in the tent.  The destination was a place only a three hour drive from my house in the southwest corner of Colorado.  Canyon of the Ancients is a National Monument.  A very special place to be able to visit.  Scattered throughout the valley are the remains of a culture that mysteriously vanished 700 years ago.  There are stone buildings crumbling into the desert and broken pottery washing from the ancient landscape.  A truly magnificent place to explore.


Most of the buildings were scattered across the landscape and required a good hike to get to.  However, there was one area known as Hovenweep that was a collection of buildings that made up a town in a shallow valley.  I was excited to see this area because I had read about it many years ago and it's story was intriguing.


Many of the buildings rose straight from the edge of the rocks they perched on.  Many were built along the edge of broken cliff faces which makes me admire the agility of the people that used to inhabit this space.  As I walked among the ruins I tried to imagine what it might be like to share this valley with hundreds of people living in and around this town.  A different way of life indeed.  These people carved out a thriving community from a barren, arid landscape and then suddenly vanished, though there are only theories as to why.  

There are many other places that I would like to explore in this area, though I only had time for this tiny adventure over the weekend.  When I have another weekend to spare I will be heading back to explore other areas of this national monument.  The relics here are numerous and I have only begun to scratch the surface of what I could learn from this place.

Saturday, April 29, 2017

Winter's Last Word

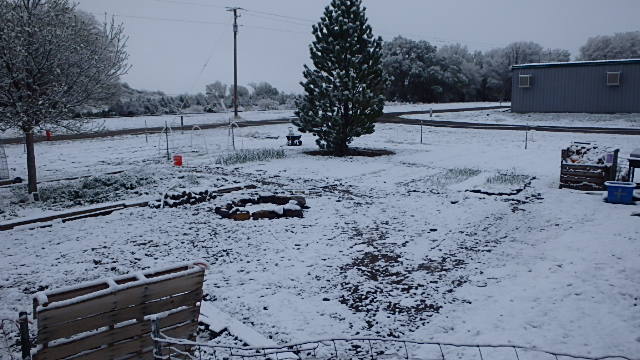
Here it is the end of April.  There were a couple of weeks of nice, mild days with temps in the 70's in the beginning of the month, but this morning I woke up to a blanket of snow on the garden.  Walking outside I found it was a very wet, heavy snow and there was nearly an inch coating everything in sight.

As I stepped outside I saw a few heavy flakes settle to the ground.  It is still snowing this morning and I am unable to see the mountains to the south or the mesa to the north.  I am hoping that the sun gets to work on warming things up here soon as I am not ready for winter to return quite yet.

My onion beds have a nice layer of snow on them, but I expect they will be fine as they are fairly hardy and tolerant of the cold.

The garlic was a little weighed down by the heavy, wet snow, but should bounce back with no problem.  These plants are used to frigid temps as they have been growing since sometime in January when the weather was much colder than this.

The peas should be ok as long as the cold doesn't stick around for too long and the broccoli sprouts that I just planted out last week will hopefully survive this little cold snap as well.  The rest of the garden is still lying dormant, but will be planted out in just a few short weeks.  I hope that spring can get it's act together by then.  

Thursday, April 27, 2017

Planting Broccoli

The weather is at the point where we are still getting chilly overnight, but the daytime temps have been in the 70's.  There are likely still a few more frosty nights in store, but spring is well on it's way.  I decided that now would be a good time to plant out my broccoli starts.  They are still on the small side, but they have been spending the better part of last week outside and seem to be thriving despite the wind and wild temperature swings.  The forecast is looking like things are going to keep getting warmer from here and even if temps do dip low, I think these seedlings are hardy enough to survive just fine.

I am trying two varieties of broccoli this year.  One is Atlantic and the other is Goliath.  The Goliath seedlings are definitely bigger than the Atlantic, but that doesn't mean that they are growing faster.  The Atlantic seem to be generally more compact plants as I recall which meant that they grew nice compact flower heads too.  The real test will be to see which variety can grow good sized heads before the flowers start to open.  Last year Atlantic won out over the Calbrese variety that I grew alongside it.

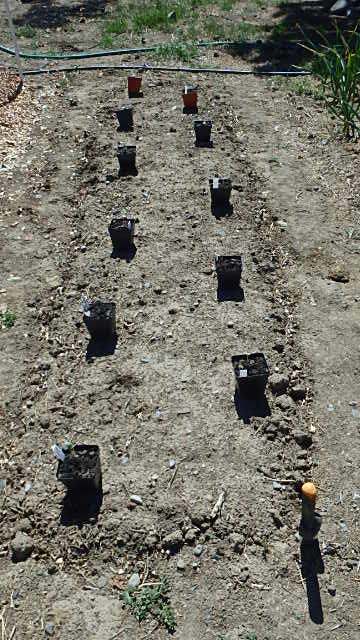
I set the seedlings out on the bed to get the spacing as even as possible.  I generally try to give my broccoli plants about 18 inches of growing space per plant.  In my 3x10 foot bed I fit eleven plants in a zig zag pattern across the bed.

After I planted all the seedlings in the bed, I arranged the drip irrigation so that it nearly touched each plant.  To make extra sure that they are getting enough water I poked a series of holes in the tubing close to each seedling.  A quick test with the water on let me know that this bed looks like it is irrigating just fine.

The final stage of planting the broccoli involves mulching in the bed.  I have been using grass clippings that are readily available.  I like that they don't blow away as easily as leaves and do a really good job of holding moisture in the soil.  Once I get the whole garden well mulched I hope I can get away with minimal watering in the heat of summer.
The thick layer of mulch is really multi-functional.  It traps moisture in soil. It shades out weed seeds and can prevent them from germinating.  It protects tender young seedlings from extreme temperatures by creating a micro climate right around the plant.  Since it is also biodegradable it will provide a little extra nutrition for my growing plants as it breaks down over the summer.  


Sunday, April 23, 2017

A Gift if Irises

In the past year I have been helping an elderly lady in town with yard work on my time off.  It has been nice getting to know her and I enjoy the hands on work in her yard.  This spring she decided that she needed to thin out her Iris patch and asked me if I would be interested in taking some.  I told her that I would be right over.  I ended up digging out four clumps of irises that should be white, yellow and purple.  Once I got home, I broke up the clumps into individual plants as best I could and arranged them around my small patch of spring bulbs that I planted last fall.  If they all survive, this flower bed will be quite lovely when they all start to bloom.

Right now they look a little beat up from their recent move.  Digging them out and separating the bulbs was pretty rough on them, but I hope that with a little tlc they will bounce back and start to grow again.  I mulched them in with a heavy layer of grass clippings to keep down the weed pressure since this bed was previously taken over by ragweed and cheatgrass.  I am hoping that the irises do well here and spread out to fill in the whole bed so I won't have to worry about weeding it anymore.  Now that the hard part is over I just need to keep up on watering it and give it time.  My reward will be a lovely colorful bed of spring blooms.

Friday, April 21, 2017

Planting Potatoes

The potatoes that I harvested last fall were kept in a dark closet over the winter in an attempt to keep them from sprouting.  Apparently they should have been kept in a colder place because they started to sprout some time in late December.  The sprouts have been growing steadily ever since.  I stopped eating them a couple of months ago because they were getting to be too soft and wrinkled for my tastes.  The long sprouts they were growing were going to give me a nice head start on the season, so I kept them for my spring planting stock.
 I had planted three different type of potatoes last year: Yukon Gold, Chieftan, and Purple Viking.  I had just enough of the Yukon Gold to plant one 20 foot row, but had an abundance of the Chieftan and Purple Viking.  I planted one row of each to try to make things even out. The left over sprouted potatoes will be going to a seed swap in a couple of weeks so I can share my over abundance with others in the area.

Planting potatoes with such long sprouts was a new challenge for me since I had never  done it before.  I did a little research and learned that laying them down in a ditch to plant them would be the way to go.  I certainly couldn't dig holes in my soil deep enough to cover these long sprouts, so lay them down I did.  I still planted the actual tubers about a foot apart, but the sprouts overlapped each other in the trenches that I dug.  I am expecting a thick mat of potatoes when they make their way through the soil.  After I covered all the potatoes with soil I laid down the irrigation lines over the rows and turned on the water to make sure all was in good working order.

This year I extended half of my garden beds to the fence line so I only needed to plant one large bed with potatoes. 

 This bed got a thick layer of grass mulch once I had another delivery of grass clippings.  As they grow I will keep adding layers to the mulch to protect the growing tubers from the light so they don't turn green on me.  In a few short weeks I am hoping this bed really comes to life.


Tuesday, April 18, 2017

Pea Progress

On the first day of spring I have made it a tradition to plant peas in the garden.  This year I planted them where my tomatoes grew last year so I could make use of the trellis without having to move it.  It was still fairly chilly in the few weeks after spring, so I kept the newly planted bed protected under a hoop house, which also helped to keep the leaf mulch from blowing away in the gusty spring winds.  It only took them a couple of weeks to come up even though it was chilly, but once they were up I don't think there was any stopping them.  Peas are hardy little plants and a couple cold nights didn't even phase them.  They are now at a point where they are putting out little tendrils to grab on to the trellis and when the weather gets a little warmer, they should really take off.  I am hoping that I will have some to harvest in just a few more weeks.


Spring peas are one of my favorite crops if only because they are one of the first harvests of the season.  I always get excited when it's time to plant them because it means that winter is officially over and the gardening season has begun.  

Sunday, April 16, 2017

Onions Are Up

The onion sets that I planted a couple of weeks ago have already broken the surface of the garden beds.  You have to look pretty close to see them, but they are coming up in droves.  I am also happy to report that the tiny seedling onions that I salvaged from cat damage have been making progress as well.  I hope they take off as well as the sets that I planted, but honestly I am just happy that they survived at all.
When they get a little taller I will lay down another layer of mulch over them to reduce the weed pressure in this bed.  If I wait until they get too tall, their leaves will be tangled together and will be harder to get the mulch down on the ground where I want it.  I hope to be harvesting this bed by August so I can squeeze in a fall crop like carrots or spinach before the year is through.  My pantry should be nice and full again this fall if all of these onions grow to a good size for me this year.

Friday, April 14, 2017

Potting Up Tomatoes and Peppers

I started my tomato and pepper seeds several months ago.  They sprouted well, but in these tiny cells they stalled out after they sprouted and were struggling to make much progress.  I decided it was time to give them a little more room to grow so I went about the task of re-potting them into larger pots.  Most of what I had were three inch pots, so those took the majority of the peppers and about half of the tomatoes.  The rest of the tomatoes had the good fortune of going directly into a handful of four inch pots that I had.

 I choose to put my two varieties of paste tomatoes into the larger pots hoping to give them a nice head start on the season.  One variety was San Marzano and I grew them from seeds that I saved from a tomato that I was given last year.  The tomato was huge and had nice thick flesh, but only had eight seeds in the whole fruit.  I planted every single seed, but only five made it to this point.  If the plants do well for me I will be saving seeds from those as well so I can share them with others.  I like to make tomato sauce and those nice thick fleshed tomatoes will make the process much easier since I won't have so many seeds to strain out.  The other variety of paste tomato that I am trying this year is an Amish Paste Tomato.  I haven't seen how big these ones are, but I always like to try a variety of plants to see what grows well for me in my soil.  The other two varieties are Black Vernissage and Moskvich.  The Black Vernissage were bonus seeds that came with my seed order this year and are supposed to make medium sized fruits that will add good flavor to sauces.  The Moskvich variety is supposed to be a fast growing, somewhat cold tolerant variety that I have been saving seeds from for several years.  They make a baseball sized red fruit that is great for slicing and salads and they seem to have fewer problems than some of the other varieties I have grown in the past.


I am growing the same varieties of peppers that I grew last year mostly because the seeds I had were getting old and I wanted to use them up.  They are all bell peppers of various colors.  Canary Bell is a yellow variety, Horizon Bell is an orange variety, Purple Beauty is a purple variety and Jupiter is a red variety that grows very large in the right conditions.  The yellow and orange peppers didn't do well for me last year, but I got an earlier start on planting them this year so I hope to see a difference in their production.

There are only a few more weeks until the weather will be nice enough to plant everything outside.  I hope these guys can make better progress now that they have more room to grow.

Tuesday, April 11, 2017

Building a Chicken Tractor for the Littles

It is almost time for the newest chicks to go outside here and I have been in limbo with the plans for them.  Originally I was going to use the small tractor that I already had for this batch of chickens, but something came up.  The rooster that I was keeping from the meat chicken adventure turned out to be really rough on the girls.  Most of them had lost a lot of feathers on their backs, one had started limping and another had a large wound from his overzealous mating habits, so I decided that he could live alone in the bachelor pad for awhile.  I still want to keep him to breed since he has such a sweet disposition towards humans, but couldn't let him harm the girls in the meantime.  I don't plan on keeping him indefinitely, but I do want to get at least one batch of chicks from him before he goes off to freezer camp.  The newest batch of chicks needs a place to go outside and since I wasn't willing to get rid of the rooster quite yet, I decided that I need to build another small chicken tractor to house them.

I was lucky enough to score a nice shipping crate from my real job.  It was a well built wooden box that only needed a little reinforcement and a few modifications to become a nice cozy home for more chickens.   I simply screwed the sides together tightly and cut a hole for the door for the chickens.   I drilled a few vent holes around the top so the small space wouldn't get too stuffy with all the chicks inside.  I left the top unattached so that I could have easy access for cleaning, but will probably cover it with a layer of plastic to help it stay drier and warmer inside and to keep the wood from swelling and cracking.

The next step was to build a frame for the run portion of the tractor.  I used three ten foot long 2x4 boards, cutting one to the the same width as the coop for each of the ends of the run.  I decided that this tractor will be attached to the coop to make it easier to move around the yard, once I get wheels on it.  I screwed the boards together into a rectangle, then attached one end to the small coop.

The next step was mounting the pvc pipes to the framework to provide supports for the chicken wire fencing that forms the enclosure.  I closed off the far end of the tractor with a piece of plywood, cut to be the same shape as the pvc hoop to make it easier to attach the chicken wire.  I cut a hole in the plywood to allow access to the run, making sure that the food and water containers fit through it.  Turns out I cut it big enough that I can fit through it too so I can get inside the run if I need to.  I attached the cut out piece with hinges and fitted latches so I can lock it closed.
Once the access door was in place I attached the whole board to the end of the run and secured it to the pvc hoop with pipe braces.  I added the third hoop of pvc for support in the middle of the run and then proceeded to cover the run with chicken wire.
The bottom of the chicken wire was secured with many staples and the top of the enclosure was woven together tightly with baling twine.  I was going to add a pvc spine across the top for extra support, but weaving the chicken wire together seems to be holding up good enough.

The last steps were adding a perch in the middle of the run, attaching small wheels to make it easier to move and covering it with a tarp to provide extra shelter from wind and rain.  I may still cover the access end to keep rain out of the food and water, but for now it is functional and can be used if I need to.  I also plan on adding a couple of perches and maybe a nesting box or two to the coop portion, but the chicks will be fine without that for a little while.

Saturday, April 8, 2017

The Last of the Fresh Carrots.

While I was getting beds ready for planting next year I came across a few more surprise carrots and even a bonus tiny parsnip in the long rows I had planted with corn last summer.  I had planted carrots, lettuce and radishes in the gaps between clumps of corn and they grew slowly in the shade of the corn patch all summer and into fall.  I allowed the survivors to overwinter outside under a heavy layer of grass mulch that I laid down last summer.  When I walked these rows to remove the irrigation lines I noticed new growth in the areas that I had planted carrots.  Since these beds will be getting tilled soon, I wanted to get the last of the produce out of them.  I dug up any area that I noticed any feathery green carrot tops.  I was happy to find that I had many good sized carrots growing at one end of the bed.  Another couple of pounds of carrots fresh from the dirt in my front yard!

Wednesday, April 5, 2017

A Gift of Raspberries

A friend of mine had the luck to get a bunch of raspberry canes and was nice enough to share them with me.  They were delivered in clumps inside of buckets and there they stayed for several days until I found the time to get them into the ground.

My biggest dilemma was deciding where I should plant them.  I knew they would need full sun and a lot of water, but they are also prone to spreading, so I didn't want them too close to my vegetable garden lest they get out of hand.  I also needed to consider being able to dig them out later, as I live on rented property and I might want to take some with me when I move.  I finally decided to put them along the fence line by the driveway.  There they will have full sun, be easy to reach for watering and will have room to spread if they do well.
First I went down the line and dug holes about three feet apart.  Into each hole I planted one cane or clump of canes and covered the roots with soil.  Once the row was planted I mulched each plant in with composting leaves that I had in a pile from last fall.  To finish things off I gave each plant a nice long drink.  In a few weeks I will know if I was successful in transplanting these raspberry canes.
If I am lucky, I might get fruit by next year!

Sunday, April 2, 2017

Onion Planting

Onion sets were out at the local farm store, so I decided that it is a good time for me to start planting my onions.  The seeds I had started were doing very well until the resident feline took it upon herself to mow them all down for me.  Some of them are still alive, but they look pretty bad.  I may try to salvage them a little later in the season when they have had more time to recover.  In the mean time I got a few bags of red and yellow onion sets for the garden, so I would have something for the intended onion bed to grow.  I was hoping that this would be the year that I grew my own onions from seed, but my bad luck with onion seed continues.

The first step to planting the onion sets was to level out the bed with my garden rake.  I wanted the bed to be as level as possible to encourage even watering.  Next I laid out the pattern for my sets, spacing them about three to four inches apart.
The spacing isn't totally perfect, but they move when I dig them in, so there is still room for adjustments.  I fit eight rows into this three foot wide bed.  Planting them close together helps them to fight weeds better since they don't have a large growth habit.  After I dug them all in a couple inches, I laid out my irrigation drip lines over the bed.  I made sure that all the lines were dripping well and then covered the whole bed with a layer of leaf mulch.  I am going to try my best to keep all of my beds well mulched this year to conserve water and to reduce weed pressure.
To help keep the leaf mulch from blowing away, I hosed the whole thing down very well and allowed the drip line to moisten the mulch from beneath for awhile. Once the onions push up through the mulch, they will help hold it in place better.  Now it should only be a couple of weeks until they start poking out of the leaves.  Spring is officially here!