Last time I went to the grocery store I came across a couple of gallons of fresh apple cider. I wanted to make some apple wine this fall and I finally had my opportunity. The apple cider was pasteurized, but didn't have any preservatives that would interfere with the fermentation process, so I bought them on the spot and gleefully took home my prize. For less than $20 I will be able to make at least 7 bottles of delicious wine!
For the basic recipe I did a very short Internet search and came across this recipe:
How to Make Apple Wine. I already had everything I needed from my previous experiments in wine making. The only thing I changed was the amount of sugar I used. I determined that what I thought were full gallons of apple wine were only 3/4 of a gallon, so I adjusted the recipe to make 1 1/2 gallons of wine instead of 2. I mixed everything but the yeast in my largest stainless steel bowl, stirring until everything dissolved in the cider. I covered this with a clean cloth and will let it sit for 24 hours before I add the yeast. Five days after I add the yeast I will then transfer the fermenting cider to my glass carboys where they will ferment until they use up all the sugar in the cider. In only a couple of months I will be bottling my first batch of apple cider wine!
Wednesday, December 23, 2015
Thursday, December 17, 2015
Investing in Garden Futures
So the holidays are drawing near and all I can think about is that there are only a few more days until the days start getting longer again. I'm so excited for spring to get here and soon it will be time to get started on planting seeds for the garden. This is one of the best times of the year - when the seed catalogs arrive and I can spend hours reading plant descriptions and dreaming of next summer's garden abundance.
I have made a quick inventory of seeds that I already had so I didn't buy seeds that I don't need. I usually get rid of seeds that are more than 4 years old just because the germination can become spotty and I don't have a lot of room under the lights for empty pots. Then I look over what types of veggies I want to have in the garden beds. This is where the seed catalogs make things interesting. I don't just grow carrots.....there are dozens of types of carrots I can choose from. I usually try to choose varieties that would grow well in my climate, or have a short growing season to make crop rotation efficient. Each type of veggie has thier own sets of strengths and weaknesses and I try to choose types of plants that would complement each other well. For example, I choose to grow a very tall variety of corn that acts as a sturdy support for the tangle of pole bean vines that I plant beside them.
I have a fairly definite plan of what I want to grow and where I want to grow it in my garden, but I always seem to order more seeds than I made room for in the garden. This is where the rest of my yard comes in. I want to try to grow small amounts of grain alternative crops such as quinoa and amaranth in parts of my yard that I don't have dedicated to veggie beds. I am trying these grains because they are more drought tolerant than others which is important in my semi arid climate. I don't want to have to use a ton of water to grow these crops, and I'm hoping to use them to supplement my chicken feed eventually.
There is also going to be a gray zone around the garden where I will allow for the overflow growth of my vining plants like squash, melons and cucumbers. This is an area that I can plant with a low growing cover crop to protect the soil until the vining plants can fill in the area. This is also an area that I can allow my chickens to roam in when I no longer want them tearing up the garden beds for me.
I plan on adding an herb patch to the yard in the spring, though I will probably get some herbs as starts from the local nursery since I tend to have a hard time getting herb seeds to germinate for me. I also plan on planting out a small strawberry patch this spring. This is one of the few perennials that I am willing to plant on a rental property - since they produce fruit fairly quickly, are low maintenance and I can take cuttings with me when I move if I so desire.
I have so much to do this spring to get this garden started that I am impatiently waiting for the season to arrive. I have so many ideas in my head for what I want to do with the yard, I can't wait to get started implementing them and seeing how they work.
Monday, December 14, 2015
Introducing My Etsy Shop
Hi all! Just wanted to share with you that I have taken the plunge and opened my own Etsy shop. You can find my hand made items here: The Handspun Homestead
Feel free to take a look at my collection of warm winter hats, scarfs, and cowls. All were crocheted by me and some even have the added blessing of using yarn that was spun by my hand as well! As I complete more projects I will be adding to the inventory of the store. I am also considering making special order items, though depending on the order, the time frame for delivery could have quite a range....I am after all only one person, and I do work a full time job which doesn't leave much time for crafting. Just contact me through my etsy shop and perhaps we could work out a deal. Thanks for looking!
Feel free to take a look at my collection of warm winter hats, scarfs, and cowls. All were crocheted by me and some even have the added blessing of using yarn that was spun by my hand as well! As I complete more projects I will be adding to the inventory of the store. I am also considering making special order items, though depending on the order, the time frame for delivery could have quite a range....I am after all only one person, and I do work a full time job which doesn't leave much time for crafting. Just contact me through my etsy shop and perhaps we could work out a deal. Thanks for looking!
Saturday, December 12, 2015
Creating A Portable Chicken Coop
I have been thinking about the different ways I could put together a chicken coop. I have looked at many plans for chicken coops and the variety is endless. After giving it some thought I decided that I want a chicken coop that isn't very big, and is easy to move. I only plan on having 6 or 7 chickens in the beginning, so a small coop will work fine. I may build a second coop for future meat bird rearing, but for now I am mostly focused on getting a small laying operation started. I also want to make sure that the coop is predator proof. I want the coop to be able to move independently of the run that I will attach to the side in order to make the whole thing lighter for me. I also want it to be fairly easy to clean out, so I want a solid floor and a large door for easy access.
My hunt for materials was short lived. A friend of a friend was moving and was going to leave behind some useful materials, so he didn't seem to mind donating them for my chicken coop. There was a well built nest box with a solid back and six nesting spaces and more pallets than I could use, so we took as many as would fit in my friends truck.
My original plan had involved breaking down the pallets and rebuilding them into walls and doors (which is very labor intensive and time consuming). My friend had a better idea, which involves less pallet deconstruction (those things aren't meant to come apart easily!). Since the pallets were already a good size being 4'x 4' we decided to just use one of the pallets as a foundation for the coop and filled in the slats of the pallet with other pallet boards to make a solid floor. By some stroke of luck, the nest box fit perfectly on one side of the pallet to make an entire wall for the coop. To make accessing the eggs easy, we removed one of the boards from the back of the nest box and reattached it with hinges. The latches to hold this new door closed were simply made from cutting up a tree branch and screwing it into place.
The other walls were going to be more of a challenge until I remembered that I had found some sheet metal siding laying on the side of my house that was left there by previous tenants. A quick inspection and some measuring revealed another stroke of luck. The sheets were almost a perfect match for the dimensions of the pallet, and there were enough pieces for all the remaining walls and the roof. First we attached the two side walls to either side of the nest box. The sheet metal was sturdy enough that we only needed to minimally frame out the open end of the box. The open end will become the large access door(s?) so I can easily clean out the floor of the coop. Then we used another large branch to make a roost inside the coop. Once that was secured we then framed out the support for the sheet of metal that was to become the roof. There is a slight slant for the roof so water can run off easily.
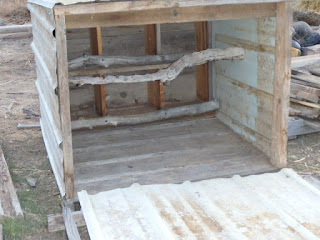


The next step will be to cut a hole on one of the sides to allow the chickens to access their run. The final touch will be adding the large access door to the open side of the coop. Eventually I would also like to add some wheels to the end to make moving the coop an easy job. All in all I am very pleased at the progress that has been made on my chicken coop. It is definitely a sturdy structure and will provide good shelter for my chickens. I think I will also be able to add a heat lamp on the inside if I need to for my younger chickens. I'm not too worried about the metal walls catching fire and there is plenty of space on the inside. Only a few more months until chicken season!
Saturday, November 28, 2015
The First of Many Dye Experiments
Finally I have all that I need to dye my first batch of roving and yarn. Since I am using merino wool roving for dyeing, I went with an acid dye since those work best on protein fibers (which is what wool is). I didn't want to spend a ton of money on learning how to dye, so I ordered a basic starter kit of Jacquard acid dyes. This came with the three primary colors of blue, yellow and red, and the color black. I figured that I could make pretty much any color I wanted with those colors so it seemed like a good place to start. The kit also came with one pound of citric acid crystals to use as a mordant.
The method of dyeing that I decided to go with was to "paint" the roving and yarn with dyes mixed in a yorker bottle. This way I have a little more control over what color goes where when I am using multiple colors at the same time. It also made it very easy to mix colors.


The method of dyeing that I decided to go with was to "paint" the roving and yarn with dyes mixed in a yorker bottle. This way I have a little more control over what color goes where when I am using multiple colors at the same time. It also made it very easy to mix colors.

This was all that I need to make a beautiful array of colors for my future yarn: roving, dye, mixing bottles, saran wrap, rubber gloves, a funnel and a rice steamer.
The first step was to protect my workspace with layers of newspaper. The dye splatters easily and I don't want stained counter tops or floors. Over the paper towels, I laid out a fairly long stretch of saran wrap. Then I measured out several 4 oz lengths of roving. My spinning wheel can only hold up to 4 oz at a time so that is why I use that amount. Then I filled a bowl with water and submerged the roving. I let the roving soak for 20-30 minutes while I prepared the different dyes that I wanted to use.
To prepare the dye I heated up some water in my tea pot until it was just boiling. Then I used the funnel to measure out my dyes into the yorker bottles. The amount of dye needed just depends on how dark I wanted the colors to be. Once the dye was in the bottle, I carefully added the hot water to the 4 oz mark on the bottle. Then I topped the bottle off the rest of the way with white vinegar and shook the whole thing to mix it up. There are many different ways that you can use your mordants. Some people soak their roving in the mordants mixed with water. Other people mix them directly with the dye itself. I don't think that it matters all that much which way you do it, as long as you use enough to make the dye stick.
In my first attempt I wanted to make roving with autumn colors, so I choose red, yellow and orange. This was a great combination to work with since orange made a nice gradient of color change between the red and yellow. I layed the wrung out roving on top of the saran wrap and arranged it into one flat layer. Then the dyeing begins. Starting at one end of the roving I squirted the red dye in a zig zag pattern across the width of the layer. Then I squished the dye into the roving to make sure that it was saturating the entire fiber. I followed the red dye with orange, and finally with yellow. Once I was sure that the roving was thoroughly saturated with dye, I covered the entire thing with another layer of saran wrap and rolled it into a tight log. I then placed the rolled up roving into the rice steamer and let it steam for 30 minutes. The heat helps to fix the dye colors to the fiber.
When the roving was done steaming I took it out and let it cool for a few minutes while I prepared the next batch for dyeing. When it was cool enough to handle with the gloves on I unwrapped the roving and rinsed it under the hottest water I could stand. You have to be a little careful when rinsing roving because if you change the temperature too much, you can cause felting which makes the roving unspinnable. Once the rinse water ran clear, I wrung out the roving one last time and then hung it up to dry.

Here are two future skeins of fiery colored yarn! Can't wait for it to dry so I can get to spinning it up!
Wednesday, November 25, 2015
Chicken Dreams
A couple of years ago I lived on a property that allowed me to have chickens. When I left there I couldn't take them with me and I have had some serious chicken withdrawal to deal with. I miss being able to gather fresh eggs (still warm) and cook up the best breakfasts I have ever had. I miss their silly antics and "grasshopper football". I also miss having a place to put my kitchen scraps without feeling like I am wasting useful material.
Happily I have moved to a place that will allow me the joys of chicken keeping once again. The only obstacle to chicken ownership is that I don't have an area to house them yet. I will probably let them free range a little bit when I can be outside keeping an eye on them, but for the most part I want to house them in some type of chicken tractor. I toyed with the idea of building a coop and a stationary pen, but I wanted to allow them to have a more flexible set up. I think I will make the run portion of the tractor the same size as a garden bed. This way I can use the chickens efficiently to fertilize and weed my garden. The coop area will attach to one end of the run and will provide nest boxes, shelter and protection from predators. I have seen quite a few foxes in my area so I will need to make the coops and runs fairly sturdy.
I have been researching the various ways to build efficient chicken tractors. The PVC pipe framed runs make the most sense economically, though I worry about their strength. The upside to PVC pipe is that the chicken run could double as a hoop house for my vegetable beds as well. Wood framed runs would be sturdier, but they would also be a lot heavier, which could make moving them more difficult. I am going to try to find some salvage materials to build the coop for the chickens. I like the idea of keeping costs down while reducing waste at the same time. I was thinking about using pallets to build the coop itself. That wood is fairly sturdy, and many places give pallets away for free.
The last, but most important decision I need to make is how many chickens do I want to have. The last time I had chickens, I mainly only used them for eggs. The only chickens I ate were the roosters, and I only had two of the course of several years. I don't think I ever had more than ten chickens at a time either. This time around I am toying with the idea of raising some chickens for meat. I'm not fond of the idea of growing out the frankenchickens that are normally raised for meat purposes, so I am leaning towards getting dual purpose breeds of chicken. I know they take a little longer to reach eating size, but I want my chickens to be healthy so they can lead happy chicken lives.
I think that I will probably keep a main laying flock of four or five birds and then raise small batches of chickens for meat birds throughout the year. Raising them in small batches will help keep my feed costs manageable, as well as making butchering day less stressful for me. I am debating on weather or not I want to keep a rooster. Roosters can be real jerks, and they can stress out the ladies if they are overzealous in their mating habits. The chickens also won't be far from the house, and the idea of waking up to a rooster at 4 in the morning isn't as nostalgic as it sounds.....roosters can be irritating when you appreciate your sleep.
I will be putting some time into this project in the coming months and will keep you posted on the progress. First step will be planning out the finer details of things. Then I will gather my materials and weather permitting, get the chicken tractor ready for chicks by spring. I can't wait to have chickens again!
Sunday, November 22, 2015
Starting my Foray into Dyeing
I have been spinning roving for a couple years now and I have always been a fan of using colored rovings, but have never dyed any myself. This changed this year when a friend introduced me to the world of dying. The pieces I dyed in my lesson with her spun up beautifully and I couldn't get the idea of creating my own color combinations out of my head.
I recently "invested" a small amount of money into supplies for my new dying adventure. I found a rice steamer at a local thrift shop for $5.00 and I was able to order a bag of 4oz. yorker bottles through my real job for only $10.00. I ordered a pound of merino/tussah roving for a fairly cheap price of $33.00, and I ordered a dyeing starter kit for another $33.00. For under $100 I am now fully prepared to start exploring the world of hand dyed fiber.
I have also been spinning a plain white yarn from 100% merino roving. I want to compare how spun yarn dyes compared to the roving. I am going to try to be organized about this whole learning process. I have bought a notebook specifically for taking notes on color, fiber type, and mordant used to help me learn about dyeing.
Thursday, November 19, 2015
Things I do to Reduce Energy Consumption
Since I make a point of trying to live a frugal lifestyle I thought I might share a few things that I do to keep my energy costs down.
1. I keep the heat set at 62 F. Any colder and even wearing layers doesn't seem like enough sometimes. (Makes hot showers feel extra nice though). I have found that it is a good temperature for sleeping.
2. I don't keep the water heater at it's highest setting. When it is at the highest setting the water coming out of the tap can easily scald me. For safety as well as for the energy savings I keep it at a setting that lets me have enough hot water for a shower, without the possibility of cooking myself.
3. I have a plastic insulating layer over all my windows. I have found that this cuts drafts down enormously and the heater kicks on much less frequently. I also have runners along my doors to keep draft down from that area as well.
4. I close off rooms that I am not using. By close off I mean I close the heating vents in these rooms and keep the door closed to prevent any additional heat loss in these areas. I basically only heat the main living area, the bedroom and the bathroom. No sense in spending money to heat rooms that don't need it.
5. I don't have a clothes dryer. I have found that I can easily dry all of my clothing on one or two drying racks. Since I only have to worry about my own laundry this works out well since I only wash one or two loads a week. It only takes a day to dry most things, though some heavier items like jeans can take two days to dry.
6. I don't have a TV. Here I can save money both by not having a cable bill, but also by not having to use electricity to keep one running for hours on end.
7. I do my best to turn off any lights in rooms that I am not using. It seems like common sense, but it still keeps energy costs low. I also use ambient lighting when at all possible. I think that lighting a few candles can help heat a small room as well as provide some light.
8. I try to do as much as I can outside when there is daylight. Not only does this keep me from using lights and other energy consuming devices indoors, but it keeps me in shape too (I don't generally sit around when I am outside!)
9. I only use cold water to wash laundry. I find that my clothes get just as clean with cold water as they do with hot, and I have less trouble with colors bleeding and fading when I only use cold water. By not heating the water for loads of laundry I also save a bit of propane in the long run.
This list is only a drop in the bucket of all the things one can do to reduce energy consumption. Feel free to add your own suggestions!
Tuesday, November 17, 2015
Hiking Adventure: Eagle Valley Trail
There are very few places to get a good hike in November where I moved from. However, here there are plenty of good places to take a hike. There has already been snow at higher elevations, but here in the valley the trails are nice and clear. This area is BLM land which means it is owned by the Bureau of Land Management. It's high desert and at this time of year, the temperatures are just about perfect for the exertion of hiking here.


This area is part of the Gunnison Gorge and is the other side of the Black Canyon. The layers of rock here are thrust up at steep angles.

The trail starts by following a slot canyon up for several hundred feet. The trail twists and turns through the canyon. Some areas are slickwashed rock.....not a place I'd want to be caught in during a downpour.


This area is full of sandstone that has been carved by millenia of wind and water. Many hollows can be found all over the cliff faces,


At the top of the ridge the trail divides, north becomes the Sidewinder trail and south becomes the Sunset Rocks trail. I followed the Sunset Rocks trail south for quite a ways. The view to the west was a beautiful panorama.

When I reached my lunchbreak point I had a fabulous view of the the valley and the plateau to the west, the San Juan Mountains to the south, and the Grand Mesa to the north. Not bad for a mid-November afternoon.

Sunday, November 15, 2015
From Wool to Wheel
There is alot more that goes into the making of yarn than most people realize. It's easy to think that it isn't that involved since you can buy a decent skein of yarn at walmart for just a few dollars. The catch for that yarn is that it is machine processed by the ton. While I don't think there is anything wrong with machine processed yarn (I used store bought yarn for years!), I think it leaves out alot of the creative process that goes along with making something out of fiber.

When you are making something from raw fiber it really helps to have in mind what you want the final product to be. Do you want something thick or thin, soft or rough, durable or dainty? Then you have to think about the color. Do you want to keep it natural or dye it some outrageous color? Do you care if your yarn is lumpy, or does it have to be smooth and even. All of these things depend on what it is you plan to make. For example, if I was going to make a rug, I wouldn't really mind if the yarn was scratchy because it will never be up against my skin. I also wouldn't care if the yarn was a little lumpy and uneven for a rug since I would most likely be weaving it and that would add a little texture to the overall design. However, if I was going to make a hat or a scarf I would want something soft and even so it feels nice and fits well.
Here is my step by step process of taking my fiber from a raw material and making into something that I could make a hat with.
Step one: Clean the fiber. Not all fiber needs to be cleaned, but most will have some vegetable matter in it if it came off an animal that lives in a pasture and doesn't wear a coat. Wool from a sheep will also feel greasy because of the lanolin in contains which is produced by the sheep to help waterproof their coat and keep them better insulated in bad weather. Some people prefer to not wash the lanolin out of their wool because it makes it easier to spin. Other animals like alpacas don't produce any lanolin, but roll in a lot of dust which makes their fiber quite dirty. Washing before you spin the fiber generally makes it a little easier to work with.

Step two: Card or Comb the fiber. In order to prepare the fiber for spinning it helps to line all the fibers up so that they can be easily drafted. This is accomplished using a carding brush or comb. There are plenty of how to videos on you tube that show this step of the process.


Step three: Spin the fiber. Spinning can be accomplished using a drop spindle or a spinning wheel. Spinning creates a twist in the fiber that allows microscopic ridges in the fiber to catch on each other and hold themselves together. This is what gives the fiber strength and allows it to be drawn out into a long continuous thread known as a single.


Step four: Ply the singles together. Plying is how yarn is made. When plying, the spinning wheel is spun in the opposite direction that the singles are spun in. This allows the singles to twist back on each other and adds bulk and strength to the yarn. You can ply together two singles to make two ply, or three singles to make three ply.

Step five: Crochet or knit the yarn into a finished product. The amount of yarn you have to work with is the only limiting factor in this step. Luckily once you know how to spin, you will always be able to make more yarn!


Step three: Spin the fiber. Spinning can be accomplished using a drop spindle or a spinning wheel. Spinning creates a twist in the fiber that allows microscopic ridges in the fiber to catch on each other and hold themselves together. This is what gives the fiber strength and allows it to be drawn out into a long continuous thread known as a single.


Step four: Ply the singles together. Plying is how yarn is made. When plying, the spinning wheel is spun in the opposite direction that the singles are spun in. This allows the singles to twist back on each other and adds bulk and strength to the yarn. You can ply together two singles to make two ply, or three singles to make three ply.

Plying two singles together
Step five: Crochet or knit the yarn into a finished product. The amount of yarn you have to work with is the only limiting factor in this step. Luckily once you know how to spin, you will always be able to make more yarn!
Wednesday, November 11, 2015
Garden Expansion
Until today, the only bed in the garden that has been prepared was the garlic bed. I had hoped to have at least half of the garden beds turned over before the weather turned too cold. In the last week we have had a bit of a cold snap. Nights have gotten well below freezing in the last week, though day time temps were mild in the 50's. We did have a fair amount of rain a couple nights ago as well. Today conditions seemed favorable for a little more soil work, and I hope that holds true for tomorrow as well. The ground isn't frozen yet, but if we have more nights below 20 I'm sure it won't be long before it is.
I started by getting a few more pieces of rebar to mark the corners of the beds. I believe this bed is going to be used for spring potatoes so I will probably set up a hoop house over it to help them get an early start. I have limited experience with season extenders, but I have found that hoophouses do a really good job of protecting fragile plants during the uncertain seasons of spring and fall. The hoophouses I make are what I call the poor man's hoop house. I can make one for about $30. I use six pieces of rebar, three 1/2inch PVC plastic pipes, and a 25 x 10 ft clear painters tarp. I find these items are the perfect size to cover my typical 3 x 10 ft beds. I generally use large rocks or straw bales to hold down the edges of the plastic.


After I outlined the bed with twine, I began the tedious process of turning the soil. Not surprisingly, this bed was also full of good sized stones which made hand digging with the shovel a great workout.
When I was done, I leveled the bed with the flat rake, then spread two bags of mushroom compost over the bed. One final turning of the soil with the shovel and a new bed is now ready for planting in spring. I covered this bed with straw to help reduce soil and moisture loss over the winter as well as to add organic matter to the bed. Hopefully the extra insulation of the straw will help make the soil soft and workable in the early spring.


The third bed that I turned over was just as tedious as the first two. I will be happy next year that I won't have to do rock removal before planting! A friend of mine also generously donated a large back of leaves from their yard. I dumped a three inch layer over this bed, then covered that with two more bags of mushroom compost.

Finally I covered the whole thing with straw. This is probably going to be one of the better producing beds next year if I had to guess. Gotta love free leaves!

Monday, November 9, 2015
Indoor Salad Box
One of the worst things about winter is not being able to garden. It is a long four months of nothing to do but dream of spring for many of us. Fortunately it doesn't have to be that way. I have started an experiment to see how long I can grow fresh salad for myself indoors. I decided that my grow lights that I use to start seeds in the spring can be put to good use through the winter as well. I also had a couple of small rubbermaid bins that I converted into indoor garden space by drilling holes in the bottom and filling them with potting soil. Turns out that they are a good depth for a small lettuce and carrot patch.


This is a box that I started a couple of months ago. There are eight romaine lettuce plants and two rows of carrots down the middle of this box. I have been harvesting the lettuce one leaf at a time for a couple of weeks now and can cut leaves two to three times a week for a salad of unparalleled freshness. The carrots still have a ways to go before I can pick them. I hope to start a second box in a month or so to help extend my salad harvest. I have also started a handful of carrot seeds in a couple of old paper milk cartons. I hope to be eating fresh carrots and lettuce from these boxes all winter long.

The best part of this whole experiment is that I will be getting fresh salad on a regular basis and it cost me next to nothing. The only things I paid for was the potting soil and the packets of seed, which probably cost less than one salad at a nice restaurant. Not too bad! Not to mention that I upcycled the rubbermaid bin and reduced some garbage by reusing the milk cartons. A win win if you ask me!
Sunday, November 8, 2015
The Product of a Late Summer Project: Wine
Shortly after I moved to the mountains I discovered the abundance of the local farmer's market. I stocked up on peaches for canning, tomatoes, peppers and garlic for salsa and ate my fill of fresh fruits and veggies. Another thing I stocked up on was fresh plums. I bought several pounds of a variety of locally grown plums and took them home to begin the process of making them into wine. The recipe that I follow can be found on Jack Keller's Wine making page: (winemaking.jackkeller.net/reques12.asp) I use the second recipe on the page to make a sweet wine.

I make wine in small batches only using a one gallon glass jug for the main fermentation. One gallon will generally give me five bottles of wine, though I used two gallons for this recipe since I had a little extra juice when all was said and done. I believe I started the wine some time in early September and let it ferment for a month before I added the final round of sugar and racked it. There it sat for another full month to allow it to finish fermenting completely and to become clear.
Today was the day I bottled the final product. I love the color of this wine! The plums I used had both red and yellow flesh, but the final color was a beautiful mixture of both.

Seven bottles were the final total with only a tiny bit left over for tasting. It was very light and sweet and will only get better with age. I can't wait to open one of these bottles in a few months!
Friday, November 6, 2015
Getting Garlic in the Ground
When I think of planting season I generally think of spring, as would most people. As I learn more about gardening, I have learned that there are some exceptions to that rule. One of them being that garlic does best when planted in the fall. Garlic is a bulb and like most early spring bulbs, they must be planted before the ground freezes for the winter. Once they are in the ground, they can go about the important business of building up their root system which comes in handy when it's time to send up shoots in early spring.


Since I am breaking ground on a new garden this fall it made the most sense to start with the bed I was going to plant garlic in. In the beginning it looked like this:

This is where the garden is going to be located. Pretty much a blank slate. I know that it seems a little close to that pine tree, but I think in the summer (which gets fairly hot here) the plants will appreciate a little afternoon shade. The area that the garlic bed is going to fill is in the middle of the whole garden.
The first task was to mark off the area that was going to be the bed. For this I just used a few pieces of rebar and some twine. I did my best to make the bed three feet by ten feet. I have found in the past that this bed size is ideal for making hoop houses over with pvc pipe and painter's plastic.
The next step was to add compost to the soil.

For this bed I settled on two bags of mushroom compost. I had planned on using horse manure from some friends of mine, but right now I don't have a good way to transport as much as I would need to use.
With the compost spread evenly over the bed, I then proceded to turn the bed over using my handy dandy shovel. This was the most labor intensive part of the whole thing mostly because of all the river rock throughout the bed. I had a hard time digging as deep as I would have liked, but I was able to remove a good deal of rock so the soil was in pretty good shape by the time I was done.

Here it is all blended nicely and raked smooth for planting.
The next step was spacing the garlic cloves in preparation for planting. I did a little homework on what the ideal spacing is for garlic and there is a bit of a range so I took the middle ground. I planted my cloves about six inches apart in a grid.

This is why I like to use a wide bed method to my garden. I can fit many more plants in a bed like this than I could planting them all in their own rows with walking space inbetween. I think the total number of cloves I planted was somewhere around 90. About half of them came from garlic that I had saved from this summer's harvest back in Illinois. I made sure to save the biggest and best heads of garlic for this purpose. The other half is made up of a couple of varieties that I bought from the local farmers market. I think one is a red skinned soft neck variety and the other is some type of hardneck garlic.
Once I had the spacing all plotted out, I went through and pushed each clove into the ground a couple of inches (making sure that the pointed side was facing up).

Once all the cloves were nestled into the bed I gently leveled the soil once again making sure to fill in all the holes. Then I mulched the whole bed with some straw. The straw will help protect the garlic from the harsh winter weather and hopefully keep the frost from heaving them out of the ground.

At some point I want to get a small hoop house up over this bed to help protect the young garlic, though it would probably be just fine without it. For right now it is probably just fine to leave it uncovered so the bed can absorb any rain that comes in the next few weeks. I may add another layer of mulch when the weather starts to get cold in the next few weeks, but for now I am considering this bed to be complete.
Thursday, November 5, 2015
Crocheting with a Passion
So as you know I have been crocheting for many years now and I think it will always be my favorite method for working with yarn. I have crocheted a variety of items from blankets to hats and scarves. I have even made a few cute shirts and shawls as well. My go to item is usually hats because my goal with them is ultimately to sell them. It has never been too difficult to find someone willing to pay for one of my hats and I will even make them custom colors if asked.
My latest endeavor in the hat making department has been to make the yarn before I make the hat. I have discovered that I enjoy spinning nearly as much as I enjoy crocheting (now that I can spin a even thickness yarn). Spinning adds a whole new dimension to crocheting. Now I can mix any colors I want in a single length of yarn which allows me to make thinner hats that are just as colorful (if not more so) than what I was making before. I also like the fact that I can work with a wider variety of fibers than what I could find at the store which opens the door to all different types of textures for my work.
I generally like to use the softest materials I can find which usually means that I use alot of alpaca fiber in my work, but I am slowly discovering the wonderful world of fiber blends. One of my new favorite blends to work with is a merino/ tussah mix which is basically sheep's wool blended with silk. It spins up unbelievably soft and is easy to keep even when spinning, not to mention the shine that is present in the final product. I like these blends because they also seem less itchy than the straight wool that most people seem bothered by. I also like the wool or alpaca blends because they are so much warmer than most manufactured yarns.
I think in this day and age the natural theme in my products is a big selling point as people are starting to pull away from artificial materials in their lives. I am learning more about using natural dyes and hope to become proficient in dying my own fiber using natural methods as well. It is amazing what colors you can find in nature, though undyed fiber is beautiful in it's own right.
Sunday, November 1, 2015
Garden Tools
My tool list for gardening is fairly short and simple and to the point. I have a shovel, a flat rake, a potato fork, a trowel and gloves. It is my intention to live simply on the earth so I do not plan on using any type of power tools in my garden, which means no tiller. I have read that tilling actually forms a compact layer deep in the soil that can actually be detrimental to plant growth, so I want to avoid that if at all possible. It may mean more physical labor in the beginning, but I think the benefits are worth it.
I do plan on trying to use a minimal or no till method of gardening, so after the first year or two I may not have much need for a shovel either. In the creation of the garden, however, the shovel is essential. I am using it to turn over the soil and add compost, which will aerate the soil and make the soil loose and fluffy which helps plants to push their roots deep into the earth to absorb nutrients. I am also using the shovel to remove rocks. My yard seems to have an abundance of smooth river rock just 3-6 inches beneath the surface and removing those will be quite the chore. The shovel works fairly well for prying them free from their shallow prisons and working the soil in the following years should be much easier.
The flat rake is used to level the beds and make a smooth surface for sowing seeds. The tines of the rake also come in handy when trying to plant small seeds in straight rows. Just drag the rake down the bed and suddenly you have twelve evenly spaced rows for planting. Flip the rake over and drag it over the seeds and everything is covered nicely in one swipe.
The potato fork is mostly self explanatory. It is used to lift potatoes from the soil, but it is also useful for digging onions, garlic, and carrots. It could also be used to turn the soil and dig out plants that are done for the season.
A trowel comes in handy for all kinds of general planting. My trowel has measurements marked on the side of the blade so it helps to make sure I am planting seeds at the correct depth. I also use it when I am transplanting seedlings or digging out deep rooted weeds.
All in all, my garden tool collection is rather modest. In the future I may add in a hoe to help with weeding, but for now I think I can live without it. One of the most important tools I will be using is the hose. I do plan on working out some form of drip irrigation for my garden, but I haven't quite decided if I am going to use a soaker hose, or fashion something from PVC pipe or old garden hoses. I need to do a little more research and maybe a little experimenting before I settle on my irrigation scheme.
Saturday, October 31, 2015
Figuring Out the Size of the Garden
Right now I am working on a layout for my garden. The space I have to work with is basically a blank slate with a tree on either side. The land does have a gentle slope and I plan to incorporate that with the layout of the beds in the garden to make the most efficient use of water in this system. I won't have access to irrigation for my garden and want to keep my watering to a bare minimum, so I plan on making some sort of drip irrigation system and using heavy mulch to conserve moisture in the soil. The mulch will also help improve the soil over time as it breaks down and adds organic matter to my dusty, rocky soil.
My last garden had eight 3 x 10 foot beds which gave me a total of 240 square feet of garden space. I am going to try to make the garden at least that size again this year with plans for expanding it as time and energy allow. I also try to allow at least two feet for walking paths between the beds to make it easy to move around in the garden for watering and pulling weeds. The only problem I have found with narrow paths is that they tend to become overgrown by the end of the season, but that just means that my garden is doing well!
The area I am going to work is going to be about 10 x 40 ft which should give me enough room for 8 beds again. I try to stick to a three foot width for each bed because that is the most comfortable for reaching across for planting, weeding and harvesting. I tend to plant my beds as densly as possible and avoid row planting because I feel like I can fit more plants in a bed than in a row. It also helps to discourage weed growth if I can space the plants so that they are just touching when they reach full size. It does take a little practice to determine how far apart plants should be, but after a few years of gardening you tend to get a general idea. Most seed packets give guidelines for plant spacing, but those are mostly for planting in rows and plants can still do well even when slightly crowded. Some types of plants like squash need alot more space than called for on seed packets and I try to plant them at the edges of the garden so they have room to roam.
I have decided to only give one bed to each type of vegetable that I want to grow next year, though ideally, some crops like potatoes and onions should get two to three beds if I am going to grow enough to last me a full year. I also tend to plant what I call fill in crops in whatever spaces I can find between my main crops. Things like carrots, lettuce, and radishes will be scattered throughout the garden which maximizes my use of space. I also have been experimenting with succession planting to extend harvests of some of my crops, though I find it difficult to remember to plant successions after the main planting because I get caught up in garden chores. Perhaps a calender of planting dates will keep me on track next year.
Friday, October 30, 2015
Garden Thoughts: Planning For Planting
One of my favorite parts of gardening is the planning phase. This is where it is easy to get carried away with the varieties of plants I want to grow, and where I want to plant them. While I would love to turn my whole yard into a garden, I do need to stay realistic about the amount of time and work I will be putting into creating the garden. I also need to stay realistic about the finacial costs involved, after all, I am living in a rental and I know it is not going to be a permanent home for me. I don't want to spend a bunch of money on planting perennials that I won't be able to harvest in the long run. The only exception that I will make to that is planting an herb garden. Most herbs are inexpensive if you buy them small from a nursery, and I don't need a ton of plants to be able to harvest what I would need for a years worth of cooking.
Fall is also the perfect time to start breaking ground on a garden. Turning over the garden for the first time and adding amendments in the fall will give the soil time to break down the organic matter into usable nutrients for the plants in the spring. Fall is also the time of year when garlic is planted. Being a bulb, garlic will be one of the first plants to appear in the spring time and also one of the earliest harvests from the garden. I have saved some of the largest bulbs of garlic from last years garden for planting this fall. I have also bought a few different varieties of seed garlic from the local farmer's market to round out my garlic varieties. We had our first frost here a couple nights ago, so this week is the prime time to be planting garlic.
As for planning the actual layout of the beds, I first need to decide what I want to grow and how many plants of each type I need. I generally only grow what I know I will eat and my ultimate goal is to grow enough vegetables to last me a whole year. There are charts you can find online and in some gardening books that will tell you the approximate yield for vegetable crops per square foot or acre. While I do find that information somewhat helpful, it isn't always accurate because there are so many variables involved when growing vegetables. Mostly I have been learning how much I should grow by trial and error. I also try to plant several different varieties of each vegetable if I can because some will always do better than others, so it decreases the chances of having a complete crop failure.
I think the best way to get a good variety of vegetables is to grow them from seed. I look through seed catalogs and choose varieties that I think would do well in my climate. I generally try to follow planting guidlines listed on the package, though I have found that some plants do better when started earlier than listed on the package. For example, pepper plants tend to grow slowly for me (probably because I keep the heat pretty low in my house) so I start them earlier so they have time to grow sturdy enough to be planted outside when the weather is right. Other plants I will start later than the guidelines recommend because they grow so quickly - tomatoes for example will become root bound if they stay in thier pots too long. I also try to plant a few extra starts for every variety because there are always some that won't make it and I want to make sure I fill my garden beds to capacity. Of course it never hurts to fill in the gaps with starts from the local nursery if all else fails.
Sunday, October 25, 2015
What I Like About Homesteading
Everyone has their own ideas about exactly what it means to be a homesteader. Truth is that the journey to being a homesteader has many steps, and many of us have only just begun our journey. Many of us dream of owning our own land, but finances or life circumstances pose a significant barrier. Some of us are happy just to grow a small garden patch to supplement what we can buy at the store. Some of us are full fledged farmers. It doesn't matter which step you are on in the journey because the motivation to work towards the goal of self sufficiency remains the same.
I like the idea of homesteading because it gives me a way to live gently on this planet. I like being able to go to my backyard and gather enough to eat. I know the food I grow is raised in a natural way and doesn't spend any time in storage or being hauled across miles of countryside. I know what goes into my canned goods because I am in charge of the ingredients. I like knowing that my garden is helping to build healthy soil, which in turn make me healthier too. I like the challenge of trying to help a landscape reach it's fullest potential. I like how the frugality of the lifestyle helps me save money towards my bigger goals in life. I like the thousands of others just like me who are doing their best to follow a similar path, and are happy to share their knowledge along the way.
I like the idea of homesteading because it gives me a way to live gently on this planet. I like being able to go to my backyard and gather enough to eat. I know the food I grow is raised in a natural way and doesn't spend any time in storage or being hauled across miles of countryside. I know what goes into my canned goods because I am in charge of the ingredients. I like knowing that my garden is helping to build healthy soil, which in turn make me healthier too. I like the challenge of trying to help a landscape reach it's fullest potential. I like how the frugality of the lifestyle helps me save money towards my bigger goals in life. I like the thousands of others just like me who are doing their best to follow a similar path, and are happy to share their knowledge along the way.
Thursday, October 22, 2015
Short Term Goals For My Future
It has only been three short months since I made the move across the country to where I now find myself. I am happy to be living in the countryside again. It is quiet here in a way you will never find in the suburbs. I am doubly happy that I moved to the mountains. I am the outdoorsy type, and am thrilled to have mountains to play on in my backyard. Perhaps I will share some of my many adventures here with you.
I was lucky enough to find a rental in the country that would allow me to have a garden and eventually chickens. As we enter the autumn of the year I have been trying to figure out the best place to have the garden and chickens. The area I live in is semi-arid and I do not have access to irrigation, so I will have to do my best to plan my garden in a water conservative fashion. I have observed that the front yard has the best exposure to the sun and seems like it would be the easiest to work with. The soil however, seems very rocky and dusty, with very little organic matter, so I will do my best to amend what I can before I ever set plants in the ground. Since I don't have much in the way of funds to work with I will also be doing things as frugally as possible.
This fall I hope to plant garlic somewhere in the yard at the very least. Towards this end I have purchased a couple bags of mushroom compost, a shovel and a garden rake. I also have a handful of garlic bulbs that I saved from the garden I had this summer, though I think I will buy some large local garlic to round it out. I hope to solidify my plans about the size of the garden so I can turn over the beds and mix in more compost to help the soil be ready for spring planting.
I also hope to work on building a small chicken tractor (or two) to house the chickens I want to get in the spring. I have already seen plenty of foxes in the area, so I will have to make it as secure as possible. I am still a little undecided about the number of chickens I want to get. I don't need a ton of egg layers, but I do want to start growing my own poultry for the freezer. I also need to decide where the chickens will live. The only summer shade would be under the tree in the front yard, and that is also on a more protected side of the house. That is likely where they will end up.
Eventually I want to make a small side business of selling hand spun items such as hats, scarves, and clothing. To that end I need to work on building up an inventory so I can have items to show vendors, and items to display at craft shows. I have been throwing around ideas for business cards and web pages, again starting small to keep costs down. I also need to price and tag the things I have already made, perhaps also taking pictures of items to sell online.
I think that is a pretty good list so far. Plans are always changing, so I'm sure there will be plenty of revisions to these goals. For now I think I have found a pretty good place to start.
How I Got Into Spinning
As a child I used to watch my grandmother and my aunt crochet all manner of things as they sat on the couch and socialized. I often tried to immitate them, though I never quite caught on to how to make anything but a chain, so chain I did. I chained entire balls of yarn because that is the only stitch I knew at the time. Twenty years later, one of my friends showed me how to crochet a blanket using what I call the granny square method. Once I figured it out I was hooked (no pun intended) once again. I worked on my first blanket for months, and when I finally finished I was so proud of my-self. I had learned an important lesson about myself: I could make useful things with yarn!
After that I became a little obsessed with all things crochet. I bought books and practiced different stitches and learned how to read patterns. It was only five or six years ago that another friend taught me the basics of crocheting hats. I made bunches of hats. It was fun trying different yarns and making different kinds of hats. I made hats nice enough that I started making them as gifts. Those went over so well, that I soon started working on a hat and scarf collection in hopes that one day I would have enough for a craft fair booth.
In the mean time I had gone to my first fiber festival with the friend that taught me how to make hats. It was there that I discovered roving and hand made yarns. There were demonstrations of sheep shearing and spinning, and many many displays of hand dyed roving and yarn. A whole new world had opened before me. It had never before occured to me that I could get yarn from somewhere besides a hobby shop, or a craft department.
But then I found out how much it costs to own a thing like a spinning wheel. Even the most basic wheel was well out of my price range, so sadly, I knew that spinning was not in my immediate future. (I had learned much later that a thing called a drop spindle exists and was actually a precursor to the spinning wheel)
Luckily for me I lived with a person that listened when I talked about the things that make me happy and one christmas I got a spinning wheel as a gift. It was an old used ashford wheel and was actually an extra wheel that a spinning teacher used to teach her students on. I was given a brief lesson in the mechanics of spinning and given a book and a bit of roving and away I went.
In the beginging it was a struggle. I couldn't get the hang of pinching the fiber with the right amount of twist and fought constantly just to keep the wheel going the right direction. My first yarn was thick and lumpy and ugly, but I didn't care. I wanted to keep spinning just to see if I could make an even and thin yarn - something I could make into a hat or a scarf.
The learning process was slow and finding time to practice wasn't exactly a priority, but my spinning did improve, slowly but surely. I am finally at a place where I can consistanly make a decent yarn and am thrilled at the possiblilties of colors and patterns that have opened up for me. I am quite proud to tell people that I make things that you could never find in a store, and I do it from scratch.
Wednesday, October 21, 2015
Introductions
Hello there, thanks for stopping by. Here at the Handspun Homestead I plan on covering a large variety of topics. Follow me on my journey as I learn the ins and outs of homesteading. I will try to share as much as I can about what I have learned about gardening, spinning, crocheting, and raising livestock. I am so happy I have this chance to share my latest adventures and experiments with you!
Subscribe to:
Posts (Atom)