Thursday, March 31, 2016

The Peppers Are Popping

A couple weeks ago I invested a few minutes of my time to start this years pepper seeds.  I am growing four different varieties of bell peppers this year: Horizon Bell which makes an orange pepper, Canary Bell which makes a yellow pepper, Jupiter which makes a good sized red pepper (or green pepper if picked before maturity), and Purple Beauty which makes a dark purple (almost black) pepper.  Now nearly three weeks later, the pepper seedlings have made an appearance.

When the time comes for transplanting these to the garden, I may get a couple of Jalapeno Peppers to add to the bed, but I didn't have any seeds to start of this variety.  I may also try some Sweet Banana Peppers if I have the room.  

Peppers can be such a beautiful and colorful addition to the garden.  I like to plant a large variety because I love to make and can homemade salsa.  Nothing beats the flavor of garden fresh ingredients in homemade salsa!  

Tuesday, March 29, 2016

The Peas Have Risen

I planted a round of peas a couple of weeks ago when the weather had a warm spell for a few weeks.  Shortly after I planted them, the weather took a cold turn and I was worried that they wouldn't germinate.  While peas are cold hardy plants, they don't germinate as well in cold soil, so I thought that I might have to replant the crop if they didn't come up soon.  Happily, they started to appear just a little over two weeks after I planted them.  They have been under the cover of the hoop house to keep the bed a little warmer than the rest of the garden, so I hope they can get off to a speedy start with their growth.

As you can see here the weeds have started to come up also.  Once these peas get a little taller, I will be sure to do a thorough weeding of this bed and put down a nice thick layer of mulch.  Until then, I will do my best to keep this bed watered, even though it takes a little more effort to remove and replace the hoop house cover.  So far the garden is off to a nice start and the growing season has just begun!

Monday, March 28, 2016

Let's Talk About Fertilizer

The growing season is just getting started and I am surrounded by the many ways there are to add nutrients to the soil.  The main nutrients that most people worry about are Nitrogen (N), Phosphorus(P), and Potassium(K).  I have learned through studying many gardening and farming books that there are many more nutrients that aid plant growth and development than just those three.

Nutrients can be divided into two main classes:  Micro nutrients, and Macro nutrients.  Macro nutrients are needed in fairly large quantities to support plant growth.  Micro nutrients are needed in tiny quantities, but still play an important role in overall plant health.  If you want to find out what nutrients are lacking or overly abundant in your soil then you should have your soil tested.  Your local extension service can help you out with this, or there are home kits you can use that give less detailed information.

Most large scale farms generally only worry about the three main macro nutrients N, P, and K.  These elements are replaced every year, generally using a synthetic fertilizer.  Unfortunately this means that their soils are generally deficient in many of the other nutrients that were used up in previous crops and never replaced.  There have been studies done that show that conventionally grown food in this current day and age is less nutritious than food grown 50 years ago due to this depletion of soil nutrients.

There are many other ways to fertilize your soil without just adding synthetic fertilizers.  My favorite method is to use compost to enrich the soil.  There are a variety of composts that you can buy from the local hardware or garden store, or you can make your own compost if you have the time.  In this year's garden I have used different composts in different beds as an experiment of sorts.  In two of my beds I added mushroom compost from the store to amend the soil.  A third bed included a heavy layer of leaves in addition to the mushroom compost, and was allowed to break down over the winter.  The rest of my beds were amended with aged horse manure that I got from a neighbor for free (Free is always the best!)  I am looking forward to finding out which composts helped the garden the most.

Another way to fertilize the garden is to do foliar feeding when the garden is growing.  This is something that I know far less about and don't really practise in my garden, but some people swear by it and it is worth a mention.  There are a variety of things that you can use for this method.  Some people use a seaweed mixture, while others may make compost tea, or some other kind of  mixture that uses worm castings which are also very rich in nutrients.  The main idea is to help the plants absorb the nutrients they need in as many ways as possible.  I think plants were better designed to absorb nutrients through their roots than through their leaves, so I haven't used any of these methods.  I do have a small worm bin however, and I am going to try to make some worm casting tea to feed my garden this summer.  Maybe I will start small in just a few beds to see if it makes a difference in the growth of the plants.

The last thing that I know of that adds nutrients to a garden is mulch.  Mulch comes in many forms.  You can use grass clippings, straw, wood chips, compost, leaves, or chopped weeds (before they go to seed) to mulch your garden.  Mulch serves multiple purposes.  It helps retain moisture in the soil because it slows down the evaporation at the soil surface.  It also helps to reduce erosion of the soil due to winds or heavy rainfall.  Mulch helps deter weeds in a bed if you use a thick enough layer because it blocks sunlight which keeps the weed seeds from germinating.  Since many mulches are organic in nature they also add nutrients to the soil slowly over the course of the season as they break down.  Mulch does so many positive things for a garden that I can't think of any reason that I wouldn't mulch all the beds in my garden this year.

Fertilizing the garden can be done in a variety of ways.  I think the more ways that nutrients are added to the soil the better.  Since I want to use as little synthetic materials in my garden as possible, I am focusing on using natural materials to enrich my soil.  For compost I used a combination of mushroom compost, leaves and aged horse manure to add nutrients to my garden beds.  I will also be using rotten hay and straw to mulch these beds as I plant them.  In this dry climate mulch will be very important to keep the moisture levels in my soil as even as possible, since I want to use as little water as possible.  I will also be mulching the paths between the beds to help retain additional moisture, and keep the weeds under control on the paths.

Friday, March 25, 2016

Baby Chickens: Four Weeks Old

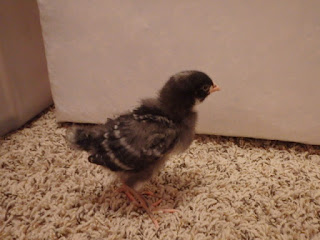
The chickens are growing fast!  They have spent the last couple of nights out in their coop with the heat lamp on.  I was a little worried the first night because it was a windy night and the outside temps hit 27 degrees.  I made sure to cover the coop with a tarp to act as a windbreak and to help insulate the coop a little.  The coop is small enough that the heat lamp has no problem keeping the space warm enough for the young chickens.  During the day I have been leaving the heat lamp on with the door open, so they can go inside and warm up if they need to.  They are learning that the coop is a warm, safe place.  Though they seem to prefer spending most of their time out in the run, happily scratching at the dirt.  Here they are at four weeks old:


They are starting to resemble grown up chickens more and more, though they are still only a quarter of their size.  This one is a very curious little chicken that comes up to me every time I sit by their run just to say hello:

They are definitely developing personalities and they each have their own little buddy that they like to hang out with the most.  It seems as though the barred rocks are the most curious and fearless of them all, while the buff orpingtons are the most easy going but shy in the group.  The Rhode Island Reds are somewhere in between, being curious and a little brave, but also fairly laid back.  


Thursday, March 24, 2016

The Brassicas Are Up!

A couple of weeks ago I had started the second round of seeds.  This round included my peppers, broccoli and brussel sprouts.  After only a few days the Waltham Broccoli appeared, followed by the Long Island Improved Brussel Sprouts and Atlantic Broccoli a couple days later.  I am so happy to see these cold hardy crops off to a great start.  Once they get a few true leaves, I will start hardening them off in a hoop house in the garden.  I am looking forward to my first fresh broccoli harvest in a few months!


Monday, March 21, 2016

Planting Perennial Flowers

I had the good fortune of someone gifting me a variety of seeds for annual and perennial flowers that were drought tolerant and good for growing in this area.  Here is the list: Candytuft, Baby's Breath, Cosmos, Pinks, Catchfly, Gallardia, Plains Coreopsis, and Baby Blue Eyes.  To this I am adding a few perennial seeds that I had in my own collection:  Purple Coneflower, Black Eyed Susans, and Chamomile.  I planted these seeds in random groupings in a large bed in the center of the front yard.  This area was previously home to many many weeds which were raked off the area to prepare the bed for planting.  I sprinkled handfuls of the seeds throughout the flower bed and my friend raked them into the bed.  We then mulched the area with some old hay from my neighbor and gave it a good soaking to give the seeds a good start.  I think this bed might be the most eye catching in the whole garden once it gets established!

Friday, March 18, 2016

Baby Chickens : Three Weeks Old

The weather has been exceptionally nice the last couple days, and the baby chickens have been busy growing their feathers, so I thought I'd give them a taste of their future home.  I was able to come home at lunch time and set them up for being outside.  I still kept their heat lamp on in the coop, but I don't think they used it since it was so nice in the sunshine.  When I came home after work the temperature had started to drop, so I brought them inside for the night.  I think they should be able to start spending nights outside soon.....maybe only one more week.  I would like them to have a few more grown up feathers before they have to spend time in a cooler environment.  So here they are at three weeks:


Thursday, March 17, 2016

Fencing Off the Yard

Today was a cooler day with a bit of wind in the afternoon.  The weather was perfect for spending the day outside setting up the beginnings of a fence.  I found some T posts in the dirt near my propane tank.  They were in need of a little straightening, but there were enough to get started with laying out the fence line.  I decided to fence off an area larger than just the garden itself to provide additional protection for my chickens.  Since I don't want them in the garden beds during the growing season, I left plenty of areas to move them around in for the summer.  I debated on fencing off the long rows that are to the side of the main garden.  In the end I ended up fencing off the whole front yard and will have a gate right next to the main entrance to the house.  The house makes up a whole side of the fenced area and also includes access for the hose, so watering the garden will be easy with this set up.


This is the view looking straight at the house.  I left some space between the fence and the stairs to make working on the fence a little easier. 

This is the other side of the yard where I left quite a bit of space inside the fence to move the chicken tractor around.  I will probably be moving it every couple weeks to keep them on fresh "pasture" as much as possible.


This is the view looking down the front of the yard.  You can see that there is also a little space between the long beds and the fence.  Behind these long beds is another open area that I will move the chickens around in.  This area may also become a larger garden expansion in the future if things go well and I stay in this rental for awhile.

The next step for the fence is to find some adequate fencing to attach to these posts.  Since I am trying to do this for free or very cheap, I have been keeping my eyes open on craigslist.  I am thinking about putting an ad on craigslist, but I may end up getting what I want from the local metal reclaiming area in my town.  For now I think I am off to a good start.  The main garden won't be going in for several more weeks, so I have time to work on finishing off the fence.

Monday, March 14, 2016

Starting Early Crops: Peas, Spinach, Lettuce and Carrots.

The garlic started coming up a couple weeks ago and the weather has become mild since then.  It is still getting below freezing at night, but the daytime temps have been in the 60's.  I decided that the time was right for starting peas out in the garden.  Peas are frost tolerant, so they make a good early garden crop.  The night before planting I made sure to soak the peas in water to give them a head start on sprouting. They swelled to three times their size overnight and hopefully will sprout in just a few days.

The next step involved marking off the bed and setting up the trellis.  Peas like something to climb and I have had some good luck planting a row on either side of a trellis.  This year's trellis is made from a scrap of old fencing that was left in the yard from the previous tenants.  I hammered three lengths of 2 ft rebar down the middle of the bed.  I then threaded some left over pvc pipe scraps onto the rebar to act as the frame for the fence.  I wove the fence through the pvc pipe and stretched it as tight as I could to make a sturdy support for my future peas.

On either side of the fencing I then dug a shallow trench and planted the peas every couple inches down the length of the bed.

Since the peas will grow up the trellis, they won't take up much space in the bed, so I decided to plant a few other cold tolerant plants along the outside of the bed.  On one side I planted a row of spinach, and on the other I planted a few varieties of lettuce.  I also tucked about a foot of carrot seeds into the corners of each row.  I chose these plants because they will grow relatively quickly and they won't interfere with the peas.  These plants will also benefit from the shade of the peas when the weather gets a little warmer, hopefully keeping them from bolting too soon.

The temperatures are still getting below freezing most nights, so I wanted to give my newly planted bed a little extra protection and warmth to get it started.  I made what I call a poor man's hoop house to protect them and act like a mini greenhouse for the seeds.  I did this by pounding rebar into the ground to provide the support for the pvc skeleton of the hoop house.  The pvc was cut to eight foot lengths and bent to fit over the rebar.  I have found that the 1/2 inch pvc pipe fits snugly over the rebar and provides a sturdy support for the plastic skin of the hoop house.

The plastic I used is an inexpensive roll of clear painter's plastic tarp.  They come in many sizes and thicknesses.  I use a tarp that is 10 ft by 25ft and 3mm thick.   A ten foot width gives me a foot of clearance on either side of my bed so I can secure the plastic well.  The twenty-five foot length gives me plenty of extra plastic to cover either end of the hoop house.  The edges are simply held in place by rolling a board in the edge of the plastic and weighing it down with rocks that I have in my yard.

This little design acts like a miniature greenhouse and warms the bed and keeps moisture in - two very important things to have when planting seeds.  The plastic also traps some of the heat of the day, keeping the air inside above freezing through the drop in temperatures overnight.  It should be enough protection to give this bed a good head start on the growing season.

I also wanted to note that I am starting these crops just after a new moon.  I have read that planting crops that are harvested above the ground grow better when planted under the waxing of the moon.  It might just be an old wives tale, but I figure it couldn't hurt to take the advice.  If it all goes well, I should be seeing new seedlings in just a matter of days.


Friday, March 11, 2016

Baby Chickens: Two Weeks Old

I am going to try to post weekly mug shots of the baby chickens, so I can share all of their awkward gawky phases with all of you.  They seem to be changing fairly noticeably every day, but the real difference can be seen in the space of a week.  They seem to double in size every week so far and if that keeps up, it won't be long until they have to be moved to the chicken tractor outside.  So here they are at two weeks old:


Sunday, March 6, 2016

Laying Out the Garden

The weather has been warming for the past few weeks, and we have had a bit of a dry spell so the soil was perfect for working.  Though I had started turning the garden with a simple spade, I was offered the help of a friend with a tiller, so I gladly accepted the assistance.  Turns out that we were able to finish in one day what would have taken me several weekends to do by hand.  We were also able to make the garden bigger than I had originally planned, which makes me very happy!  I hope I will be able to keep up will all the weeding that establishing this garden will require.

The original garden plan called for eight 3x10 foot beds.  With the help of the tiller, the main garden area has nine 3x10foot beds.  We were also able to add another four beds next to the main area for a total of thirteen regular garden beds.
In this picture you can see the the chicken tractor's run fits perfectly over a bed.  Once the chickens are old enough to move outside, I will be letting them work over the beds until I am ready to plant my main crops in them.

The final addition to the garden plans were these three 75foot long rows that we tilled up at the front of the yard.  I am planning on planting some drought tolerant crops like amaranth, quinoa, and some really tall growing corn to make a nice wind break and visual block for the road.  These plants will be supplementing my chicken feed and hopefully reducing my costs of raising chickens even further.  I may even plant some squash plants among them to act as a cover crop that helps to minimize weeds in these beds.

This a view of the whole garden from the far corner of the yard.  I was happy to find that it is so large that it is difficult to fit it all into one camera angle.  This is by far the best viewpoint, though once the taller crops take off, the best view will probably be the one from my window - looking straight down the center of the garden.

Friday, March 4, 2016

Baby Chicken Mug Shots

I can't believe how fast these guys are growing!  Only a week old and they are working hard at growing their big bird feathers!  I wanted to keep track of them as they grew, so here are their first mug shots:


Wednesday, March 2, 2016

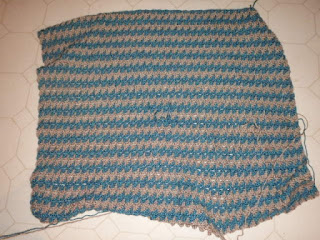
Latest Crochet Project : Baby Blanket

It has been awhile since I posted anything fiber related and this is mostly due to the length of my current project.  I am crocheting a baby blanket for a friend that is due to have a son in May.  I started the project almost two months ago, but only work on it a little bit at a time.  I have so many other little projects going on that I save most of my crocheting for the evenings when I run out of daylight for outdoor activities.  Most nights it seems I am so worn out from the day that I rarely have the energy to spend working on this blanket, though I have still managed to get it to the halfway point.
The yarn that I am using is from the store, but the colors work well together and I think it will be a perfect fit for the baby boy.